
Health
How To Make The Most Amazing Candyland Cake

Cake is one of those things that can be enjoyed by everyone, no matter what their dietary restrictions may be. Whether you’re looking for something to celebrate a special occasion or just want to treat yourself, cake is the perfect answer. In this post, we will show you how to make the most amazing Candyland cake. This cake is sure to wow your friends and family, and it’s also a breeze to make. So get ready to get baking!
What You’ll Need
To make this cake, you’ll need:
1 box of cake mix (regular or chocolate)
3 eggs
1 cup vegetable oil
2 cups water
1 cup white sugar
1 teaspoon vanilla extract
24 cups powdered sugar
24 ounces semi sweet chocolate chips
Directions: Preheat oven to 350°F. Grease and flour one 9×13 inch baking dish. In a large bowl, combine cake mix, eggs, vegetable oil, water and white sugar. Mix well and pour batter into prepared baking dish. Bake for 30 minutes or until a toothpick inserted into center comes out clean. Cool on a wire rack for 10 minutes before inverting onto a serving platter. For the frosting: In a medium saucepan over low heat, melt 24 ounces semi sweet chocolate chips with 1/4 cup butter (or margarine). Stir occasionally until melted and smooth. Remove from heat and spread over cake in serving dish. Let frosting set before serving.
How to Make the Cake
Cake-making is a skill that many people want to perfect. The process of making a cake from start to finish can be daunting, but with the right resources and techniques, it can be easy enough for anyone to make. There are many different types of cakes out there, and each one requires a slightly different approach in order to produce an excellent final product. This article will outline the steps necessary for creating the perfect candyland cake.
The first step in any cake-making process is understanding the basics of baking powder and baking soda. These two ingredients are what give cakes their unique texture and flavor. To activate these ingredients, you need only wet them and then pour them into your dry ingredients. Be careful not to overmix these ingredients or you will end up with a tough cake.
Once your Cake mix is together, add oil, eggs, and water according to package directions. Pour this batter into a prepared pan and bake until a toothpick or cake tester comes out clean when inserted into the center of the cake (around 20 minutes). Allow this cake to cool completely before frosting it.
The next step in making this particular cake is preparing the frosting. Candyland Cake is typically frosted with chocolate buttercream so you will need to make that first. In a medium bowl or mixer fitted with an electric mixer, cream together butter and light brown sugar until light and fluffy (about 2 minutes). Add cocoa powder and vanilla extract, mixing until well
How to Make the Frosting
Ingredients:
1 cup (2 sticks) unsalted butter, at room temperature
⅓ cup light corn syrup
2 teaspoons pure vanilla extract
2 cups confectioners’ sugar, sifted
1 teaspoon baking powder
1 teaspoon baking soda
Pinch of salt
Frosting:
6 tablespoons unsalted butter, at room temperature
3 cups confectioners’ sugar, sifted
2 teaspoons pure vanilla extract
How to Assemble the Cake
Cake Assembly:
1. Preheat oven to 350 degrees Fahrenheit. Grease and flour two 9-inch round cake pans. Line the bottoms of the pans with parchment paper and grease the paper.
2. In a medium bowl, combine 1 cup of white sugar, 2/3 cup of all-purpose flour, 2 teaspoons baking powder, 1/4 teaspoon salt, 1/2 teaspoon vanilla extract, and 3/4 cup milk. Mix well to combine and set aside.
3. In a large bowl, cream together 1 cup of butter and 2 cups of white sugar until light and fluffy. Add 3 eggs and mix well to combine. Add 3/4 cup of blackstrap molasses and mix well to combine.
4. Add one quarter of the dry ingredients to the wet ingredients and mix well to combine. Add one third of the blackstrap molasses mixture to the batter mixture and mix well to combine; do not overmix! Pour batter into prepared cake pans, making sure that it fills them evenly.
5. Bake cakes for 30 minutes or until a toothpick or cake tester comes out clean when inserted into the center of each cake layer. Let cakes cool in pan for 5 minutes before removing them from pans to cool completely on wire racks (or serving right away if you prefer). Frosting:
In a large bowl or mixer fitted with an electric mixer on medium speed, beat together 6 cups (or enough cream
How to Store and Serve the Cake
This cake is so good, and it’s definitely a show-stopper! It’s also really simple to make, so it can be a great cake to make for a party.
Ingredients:
Cake:
1 cup (2 sticks) unsalted butter, at room temperature
2 cups granulated sugar
3 large eggs, beaten
2 teaspoons pure vanilla extract
6 cups all-purpose flour
1 teaspoon baking powder
1/2 teaspoon salt
Frosting:
6 ounces cream cheese, at room temperature
1 cup confectioners’ sugar, sifted
1/4 cup milk or heavy cream, plus more as needed
Directions: 1. Preheat oven to 350 degrees F (175 degrees C). Butter and flour an 8×8 inch baking dish. 2. In the bowl of your electric mixer, beat the butter on medium speed until light and fluffy. Add the granulated sugar and continue beating until light and fluffy for about 5 minutes more. 3. With the mixer on low speed, add one egg at a time and mix just until each has been fully incorporated. Stir in the vanilla extract. 4. Add half of the flour mixture to the mixer bowl; beat just until blended. Scrape down the sides of the bowl as needed. Add half of the batter to the prepared baking dish; spread evenly with a spatula or spoon. Sprinkle with coarse sugar crystals (see Note). Bake for 15 minutes until golden
Cake Ingredients
Ingredients:
1 3/4 cups all-purpose flour
3/4 cup unsweetened cocoa powder
2 teaspoons baking soda
1 teaspoon salt
1 1/2 cups (3 sticks) melted butter
2 2/3 cups sugar
6 large eggs, beaten
2 teaspoons vanilla extract
8 ounces cream cheese, softened
16 ounces semi-sweet chocolate chips (2 bags) Directions: Preheat oven to 350 degrees F (175 degrees C). Grease and flour one 9×13 inch baking pan. In a medium bowl, whisk together the flour, cocoa powder, baking soda and salt. In a large bowl, combine the melted butter and sugar until smooth. Add the eggs and vanilla extract; mix well. Pour the batter into the prepared pan. Sprinkle the chocolate chips over the top. Bake for 30 minutes or until golden brown on top. Cool in pan for 10 minutes; then transfer to a wire rack to cool completely
Cake Directions
Ingredients:
1 cup (2 sticks) unsalted butter, at room temperature
2 cups granulated sugar
3 large eggs
2 teaspoons pure vanilla extract
2 cups all-purpose flour
1 teaspoon baking soda
½ teaspoon baking powder
pinch of salt
10 ounces semisweet chocolate, finely chopped (about 2 cups)
10 ounces white chocolate, finely chopped (about 2 cups)
Directions: 1. Preheat oven to 350 degrees F (175 degrees C). Butter and flour two 13×9 inch baking pans. 2. In the bowl of an electric mixer fitted with the paddle attachment, beat butter on medium speed until creamy. Add sugar and beat until light and fluffy. Beat in eggs one at a time, then stir in vanilla extract. 3. In another bowl, whisk together flour, baking soda, baking powder and salt. Gradually add to butter mixture alternately with chocolate until both are fully incorporated. 4. Pour batter into prepared pans and bake for 25 minutes or until a toothpick inserted into the centers comes out clean. Cool in pans for 10 minutes before transferring to a wire rack to cool completely.
Frosting Directions
1. Place the butter and sugar in a saucepan and heat over a low heat until the sugar has melted.
2. Increase the heat to medium and continue to stir until the mixture is smooth.
3. Gradually add the beaten egg, one at a time, stirring constantly until well mixed in.
4. Add the vanilla extract and cream and continue to stir until frosting is smooth and creamy.
5. Pipe frosting onto cake using a piping bag fitted with a star tip or use an electric mixer to beat frosting until smooth.
Decorating and Serving Instructions
Candyland cake is the perfect centerpiece for any party. It’s simple to make and looks great with any decoration you choose. Here are some decorating and serving instructions to help make your cake a success!
To start, prepare your icing by mixing together butter, sugar, vanilla extract, and milk in a bowl until smooth. Add additional milk if desired for a thinner consistency.
Once your icing is ready, set aside one cup of it to use as a “glue” for the cake later on. To make the candy land border, begin by cutting out 10 circles from a green sugar cookie dough (or another color of your choice). Press each circle into the bottom of an 8-inch round cake pan and bake them at 350 degrees Fahrenheit for 8-10 minutes until golden brown. Allow them to cool completely before filling them with your favorite flavored jelly or cream cheese frosting.
For the Candyland castle walls, begin by baking nine yellow sugar cookies according to package instructions. Once they are cooled completely, frost them with royal blue jelly or cream cheese frosting and then cut out 12 small triangle pieces from white chocolate candy bars. Sandwich each triangle between two yellow sugar cookie halves and press against the sides of the cake pan to secure. Once finished, allow the castle walls to cool completely before serving!
This delicious candyland cake is sure to be a hit at any party! Be sure to follow these easy decorating and serving
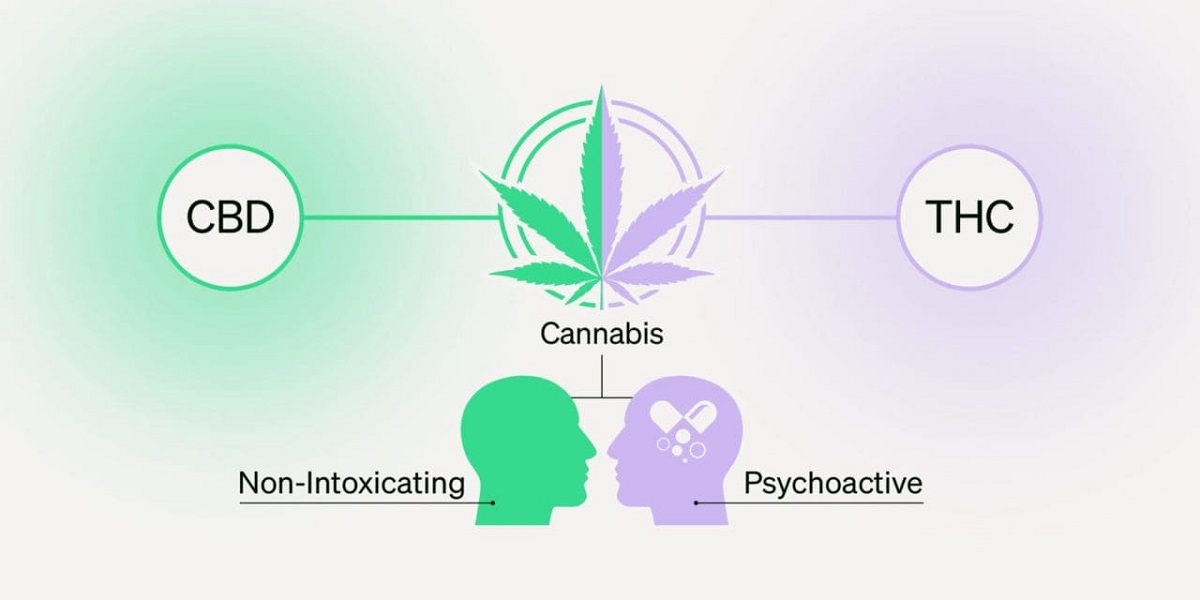
The cannabis and hemp industry has seen massive innovation over the past few years, with new products designed to meet the diverse needs of consumers. Among the most popular and convenient options are THC Shooters and CBD shots. While these beverages may look similar in size and packaging, their effects, uses, and legal standing are very different. For anyone exploring cannabis or hemp products, understanding the distinction between THC and CBD shots is essential to making an informed choice.
What Are THC Shooters?
THC Shooters are small, concentrated cannabis-infused drinks that contain tetrahydrocannabinol (THC), the primary psychoactive compound in cannabis. Unlike smoking or vaping, shooters provide a discreet and easy way to consume THC without inhalation. These products typically come in small bottles often 2 to 4 ounces allowing users to quickly consume a precise dose.
The main appeal of THC Shooters lies in their potency and fast-acting effects. Since they are liquid-based, the body can absorb THC more quickly than traditional edibles, such as gummies or baked goods. This makes shooters a preferred option for recreational consumers seeking an uplifting or euphoric experience. Depending on the dosage, they can provide feelings of relaxation, creativity, or even heightened sensory awareness.
What Are CBD Shots?
CBD shots, on the other hand, are small beverages infused with cannabidiol (CBD), a non-psychoactive compound derived from hemp or cannabis plants. Unlike THC, CBD does not produce a “high.” Instead, it interacts with the body’s endocannabinoid system to promote balance and wellness.
These shots are often marketed as wellness supplements rather than recreational products. They can be infused with additional ingredients like vitamins, adaptogens, or natural flavors to enhance relaxation, focus, or energy. CBD shots are popular among people who want the therapeutic benefits of cannabis without intoxication.
The Key Differences Between THC Shooters and CBD Shots
1. Psychoactive Effects
The most obvious difference is the effect on the mind. THC Shooters deliver a psychoactive experience, which may range from mild relaxation to a strong euphoric “high.” CBD shots, however, are non-intoxicating and primarily focus on wellness benefits like stress relief, reduced anxiety, or improved sleep.
2. Legal Considerations
In regions where recreational or medical cannabis is legal, THC-based products like shooters are widely available. However, in places where cannabis remains restricted, they may be illegal. CBD shots, derived from hemp containing less than 0.3% THC, are federally legal in many areas, making them easier to access.
3. Usage Purposes
THC Shooters are often chosen for recreational enjoyment, creative stimulation, or social experiences. CBD shots are typically used by individuals seeking natural relief from issues like inflammation, anxiety, or fatigue without impairing mental clarity.
4. Duration and Onset
Both THC and CBD shots act faster than traditional edibles due to their liquid form. THC effects are often felt within 20–40 minutes and can last several hours. CBD shots also provide relatively quick relief but without the intense “ride” associated with THC.
Who Should Choose THC Shooters?
THC Shooters are ideal for adults in legal markets who want to experience the psychoactive effects of cannabis in a convenient, discreet form. They’re also a great choice for social events or for those who prefer not to smoke. Since shooters can be quite potent, beginners should start with smaller doses to avoid overwhelming effects.
Who Should Choose CBD Shots?
CBD shots are best suited for individuals looking to enhance their wellness routine without altering their mental state. They are popular among busy professionals, athletes, or anyone interested in natural ways to manage stress, pain, or sleep challenges. Since they are non-intoxicating, CBD shots can be consumed at any time of day, even during work hours.
The Growing Popularity of Cannabis Beverages
Both THC Shooters and CBD shots are part of the growing cannabis beverage trend. Consumers are increasingly drawn to drinks because they are portable, discreet, and offer more predictable dosing compared to traditional edibles. The convenience of a “grab-and-go” wellness or recreational shot makes them appealing to both newcomers and seasoned cannabis users.
Conclusion
When comparing THC Shooters and CBD shots, the choice ultimately depends on personal goals. If you are seeking a euphoric, psychoactive experience, shooters infused with THC are the right option provided you are in a legal market and consume responsibly. If your focus is on health, balance, and relaxation without intoxication, CBD shots may be more suitable.
As cannabis beverages continue to evolve, both THC and CBD shots will likely remain popular, serving two very distinct audiences: one seeking recreational enjoyment and the other prioritizing wellness and calm. By understanding the differences, consumers can confidently choose the product that best matches their lifestyle and needs.

Introduction
If you drive a 2007 Ford F-150 with the 5.4L engine, you know it’s a reliable truck. It’s tough, powerful, and built for work or family use. But like any vehicle, it has weak spots. One of those is the buildup of oil vapors in the intake system.
This is where a PCV oil catch can comes in. Installing a catch can on your 2007 Ford F-150 5.4L helps reduce carbon buildup, keeps the intake cleaner, and improves long-term performance. Many truck owners overlook this upgrade, but it can make a big difference in engine health.
In this guide, we’ll explain what a PCV oil catch can does, why it’s important, and how you can install and maintain one. We’ll also share real owner experiences, common mistakes, and practical tips to help you get the most out of your Ford.
What Is a PCV Oil Catch Can?
A PCV oil catch can is a small device connected to your truck’s positive crankcase ventilation (PCV) system. The PCV system takes gases and oil vapors from inside the engine and routes them back into the intake. This helps reduce emissions.
The problem is that along with air, the system pulls in tiny oil droplets. Over time, those droplets build up inside the intake manifold and throttle body. This can lead to carbon deposits, sticky valves, and reduced performance.
The oil catch can solves this problem. It traps those oil vapors before they reach the intake. Clean air flows through, but oil and gunk get caught in the can. That means less buildup, a cleaner engine, and longer life for your 5.4L motor.
Why Your 2007 Ford F-150 5.4L Needs One
The 2007 Ford F-150 with the 5.4L Triton V8 is known for power, but it also has issues with carbon buildup. Over time, oil deposits in the intake can cause rough idling, hesitation, and even loss of horsepower.
Installing a PCV oil catch can helps reduce these problems. It keeps the air going into your engine cleaner, which means smoother combustion. Owners often report that their trucks run better, idle smoother, and even get a small bump in fuel economy.
Another reason your F-150 needs a catch can is longevity. When your intake valves stay clean, your engine doesn’t have to work as hard. That reduces wear and tear, which helps your truck last longer. For a vehicle as valuable as a Ford F-150, this is a smart investment.
How the PCV System Works in Your Truck
To understand why a catch can matters, it helps to know how the PCV system works.
When your engine runs, pressure builds inside the crankcase. Without a way to vent it, that pressure could damage seals or cause leaks. The PCV valve solves this by allowing gases and vapors to escape. These gases are sent back into the intake so they can be burned again.
On paper, this is a good system. It reduces emissions and keeps your engine efficient. But it’s not perfect. Oil mist often rides along with the gases. In a 2007 F-150 5.4L, this oil mist can collect on intake valves, spark plugs, and sensors. That’s where a pcv oil catch can 2007 ford f150 5.4lit can makes a big difference by filtering out that unwanted oil.
Common Problems Without an Oil Catch Can
If you don’t use a catch can, your 2007 Ford F-150 5.4L may develop several issues over time:
-
Carbon buildup on intake valves
-
Reduced performance and sluggish acceleration
-
Poor fuel economy due to dirty combustion
-
Check engine lights from fouled sensors
-
Oil pooling inside the intake manifold
Some owners even report having to clean their intake system more often, which costs time and money. The Triton V8 is strong, but like many engines, it doesn’t like running on dirty air. That’s why an oil catch can is a smart preventative step.
Benefits of Installing a Catch Can on a 5.4L Engine
Adding a PCV oil catch can to your 2007 Ford F-150 5.4L brings several clear benefits:
-
Cleaner intake system – Less carbon buildup means smoother airflow.
-
Better fuel economy – Cleaner combustion helps you get more miles per gallon.
-
Longer engine life – Reducing gunk protects valves and pistons.
-
Improved performance – Many owners feel better throttle response.
-
Lower maintenance costs – Fewer cleanings and fewer repairs over time.
Think of it like a filter for your engine’s breathing system. You wouldn’t drive without an air filter, so why let oil mist clog up your intake?
Choosing the Right Oil Catch Can for Your Ford F-150
Not all oil catch cans are the same. When shopping for one, look for these features:
-
Quality materials: Aluminum cans last longer than plastic ones.
-
Baffled design: Helps trap more oil and vapors.
-
Easy drain system: A drain valve makes emptying faster.
-
Direct fit kits: Some are made specifically for Ford F-150 trucks.
Popular brands among F-150 owners include JLT, Mishimoto, and UPR. While universal catch cans are cheaper, a kit designed for the 2007 F-150 5.4L will fit better and look cleaner under the hood.
Step-by-Step Guide to Installing a Catch Can
Installing a catch can on your 2007 Ford F-150 5.4L is a straightforward project. Here’s a simple guide:
-
Locate the PCV hose – It usually runs from the valve cover to the intake.
-
Remove the hose – Gently disconnect it from both ends.
-
Mount the catch can – Find a secure spot in the engine bay.
-
Connect new hoses – Route one from the PCV valve to the can, and another from the can to the intake.
-
Secure with clamps – Make sure everything is tight and leak-free.
-
Check for clearance – Ensure hoses don’t rub against moving parts.
Most installs take about an hour with basic tools. If you’re not comfortable, any mechanic can do it quickly.
Maintenance Tips for Long-Lasting Performance
A catch can is low-maintenance, but it does need attention. Here’s how to keep it working:
-
Empty the can regularly – Every 1,000–3,000 miles, depending on driving style.
-
Check hoses and fittings – Make sure nothing is loose.
-
Clean the can – Wipe out residue every few oil changes.
-
Monitor oil levels – A catch can won’t affect your dipstick reading much, but always double-check.
With regular care, your oil catch can will keep protecting your Ford F-150 for years.
Real-World Results: Owners’ Experiences
Many 2007 Ford F-150 5.4L owners who install a catch can report positive results. Common feedback includes:
-
Noticeably cleaner intake manifolds during inspections
-
Less oil smell in the engine bay
-
Improved throttle response and smoother idling
-
Longer intervals between needing intake cleanings
One owner even mentioned that after installing a catch can at 100,000 miles, his truck’s idle became steadier, and spark plugs lasted longer than before. Real-world use proves that catch cans aren’t just hype they deliver results.
Mistakes to Avoid When Using a Catch Can
While catch cans are helpful, there are a few common mistakes:
-
Not emptying it – A full can can’t catch more oil.
-
Poor mounting – Loose cans may rattle or cause leaks.
-
Cheap hoses – Weak hoses can collapse under vacuum pressure.
-
Wrong routing – Reversing the hoses means it won’t work properly.
Avoiding these mistakes ensures your catch can does its job correctly and keeps your F-150 running strong.
Cost vs. Value: Is It Worth It?
A quality oil catch can costs between $100–$200, plus installation if you don’t DIY. That may sound like a lot for a small part, but consider the savings:
-
Intake cleanings can cost $300+
-
Repairs for fouled valves or sensors can cost even more
-
Better fuel economy saves money at the pump
When you look at it this way, a catch can is an affordable insurance policy for your 2007 Ford F-150 5.4L.
Alternatives to Oil Catch Cans (and Why They Fall Short)
Some people ask if fuel additives or regular cleanings can replace a catch can. While these help, they don’t stop oil from entering the intake in the first place. Additives may clean some buildup, but prevention is better.
Another alternative is deleting the PCV system, but this isn’t recommended. It can cause pressure issues, oil leaks, and even legal problems since it removes an emissions system.
In short, nothing replaces the consistent protection of a well-installed oil catch can.
Frequently Asked Questions
1. What does a PCV oil catch can do for my Ford F-150?
It traps oil vapors before they reach your intake, keeping it cleaner and improving performance.
2. Will installing a catch can void my warranty?
No, a catch can doesn’t harm your engine. It’s a simple add-on. Still, always check with your dealer.
3. How often should I empty my oil catch can?
Most owners empty it every 1,000–3,000 miles, but it depends on driving conditions.
4. Is a catch can hard to install on a 2007 F-150 5.4L?
Not at all. Most people can install one with basic tools in about an hour.
5. What’s the best oil catch can brand for Ford trucks?
Popular brands include Mishimoto, JLT, and UPR. Choose one designed for your F-150.
6. Can I drive without a catch can?
Yes, but you’ll likely face more carbon buildup and intake cleaning over time.
Conclusion
Your 2007 Ford F-150 5.4L is built tough, but even tough engines need a little extra care. A PCV oil catch can is a simple, affordable upgrade that protects your intake system, improves performance, and extends engine life.
By catching oil before it causes buildup, you save time, money, and headaches down the road. Whether you’re hauling, commuting, or just enjoying your truck, an oil catch can helps it run cleaner and stronger.
If you haven’t installed one yet, now’s the time. Protect your Ford, keep it running like new, and enjoy every mile with confidence.

Introduction
If you’ve ever wondered, “When were lobotomies made illegal?”, you’re not alone. The lobotomy is one of the most shocking and controversial procedures in medical history. Once seen as a miracle cure for mental illness, it later became a symbol of medical overreach and ethical failure.
This article takes you on a journey through the origins of lobotomies, why doctors thought they worked, the painful stories behind them, and how the world finally turned against the practice. We’ll explore not just when lobotomies were made illegal, but also why they fell out of favor, what replaced them, and what lessons we can learn today.
So grab a cup of coffee, sit back, and let’s uncover the truth about this dark yet fascinating chapter of medicine.
What Exactly Is a Lobotomy?
A lobotomy is a surgical procedure where doctors cut or damage parts of the brain’s frontal lobes. The idea was simple: if mental illness came from overactive brain circuits, then damaging those circuits might “calm” the patient.
The procedure became popular in the 1930s and 1940s. Portuguese neurologist António Egas Moniz developed the first version, earning him the 1949 Nobel Prize. Soon after, American psychiatrist Walter Freeman made lobotomies famous in the United States with his faster, cheaper “ice-pick” method.
At first, lobotomies were hailed as groundbreaking. Patients who had been locked away in asylums sometimes appeared calmer afterward. But the results came at a terrible cost personality changes, permanent disability, and in many cases, death.
Why Did Doctors Think Lobotomies Were Helpful?
Back then, mental illness treatments were limited. There were no antidepressants, no modern therapy, and very few effective medications. Asylums were overcrowded, and families were desperate.
Lobotomies promised a quick solution. Patients who had been violent or distressed often became quiet. To doctors in the mid-20th century, this seemed like success. In fact, thousands of lobotomies were performed in the U.S., especially in state hospitals.
However, what doctors saw as “calm” was often just a loss of personality, independence, and cognitive function. Families noticed their loved ones came back “different” sometimes childlike, emotionless, or unable to care for themselves.
This gap between medical hope and human suffering is one reason the world later asked: when were lobotomies made illegal?
The Rise of the Ice-Pick Lobotomy
Walter Freeman was not a surgeon but a psychiatrist. Still, he popularized the transorbital lobotomy, also known as the “ice-pick” method. With an actual ice-pick-like tool, Freeman would push through the eye socket into the brain, severing connections.
He performed the procedure in his office, in hospitals, and even on tours across America. Freeman believed lobotomies could treat depression, schizophrenia, anxiety, and even simple nervousness.
At the peak of the lobotomy craze, nearly 40,000 Americans underwent the procedure. Some were willing, others were not. Even children were lobotomized. One of the most famous cases was Rosemary Kennedy, sister of President John F. Kennedy, whose lobotomy left her severely disabled for life.
The Turning Point: When Public Opinion Shifted
The tide began to turn in the 1950s. Several key developments changed how people viewed lobotomies:
-
Tragic outcomes became known – Stories of patients who were permanently harmed began to spread.
-
Medical ethics improved – Doctors faced more accountability for experimental treatments.
-
New medications appeared – Antipsychotic drugs like chlorpromazine offered safer, non-surgical alternatives.
By the 1960s, lobotomies were widely criticized. Journalists, families, and even other doctors spoke out. The question of when were lobotomies made illegal became urgent, as governments debated whether to ban the practice outright.
So, When Were Lobotomies Made Illegal?
Here’s the surprising truth: lobotomies were never officially banned in every country at the same time. Instead, their use declined gradually due to public outrage and better treatments.
-
United States: Lobotomies largely ended in the late 1960s and 1970s. No federal law banned them outright, but medical standards made the practice unacceptable.
-
United Kingdom: The Mental Health Act of 1983 required special permission for psychosurgery, effectively ending lobotomies.
-
Other countries: Most European nations phased out lobotomies between the 1970s and 1980s, though some procedures lingered.
So, the answer to “When were lobotomies made illegal?” is complex. They weren’t suddenly outlawed everywhere, but instead became seen as unethical, dangerous, and outdated.
The Role of Medication in Ending Lobotomies
One of the biggest reasons lobotomies disappeared was the rise of psychiatric drugs. In the 1950s, medications like Thorazine (chlorpromazine) gave doctors new ways to treat severe mental illness.
These drugs didn’t require surgery, didn’t cause brain damage, and were much safer overall. Hospitals quickly adopted them, and lobotomy numbers dropped. Patients who might once have been operated on now received medication and therapy instead.
This shift shows how medical progress can save lives. The introduction of better treatments answered the question not just of when lobotomies were made illegal, but why they became unnecessary.
Famous Cases That Changed Public Perception
The tragic story of Rosemary Kennedy is perhaps the most famous lobotomy case. Her surgery in 1941 left her permanently incapacitated, shocking the Kennedy family and later the public.
Other notable cases included celebrities like playwright Tennessee Williams’ sister, Rose, who also underwent a lobotomy. Countless unnamed patients in psychiatric hospitals suffered the same fate.
These personal stories fueled outrage. They made people realize lobotomies were not a miracle cure but a risky experiment on vulnerable people. By the 1970s, the pressure to stop lobotomies grew stronger than ever.
The Ethical Lessons of Lobotomies
The story of lobotomies isn’t just medical history it’s also a lesson in ethics. Doctors once thought they were helping, but their methods caused harm. Patients often couldn’t give informed consent, and many procedures were done without full understanding of the risks.
Today, medical ethics emphasize patient rights, informed consent, and evidence-based treatments. The painful question of when lobotomies were made illegal reminds us why these rules are so important.
Are Lobotomies Still Performed Today?
In most of the world, lobotomies are no longer performed. However, a modern and very different procedure called psychosurgery still exists in rare cases. For example, deep brain stimulation or cingulotomy may be used to treat severe, treatment-resistant conditions like OCD.
These modern surgeries are highly controlled, ethical, and performed only when all other treatments fail. They are nothing like the crude lobotomies of the past.
So while lobotomies as we know them are gone, their history continues to shape how medicine approaches mental health.
What Replaced Lobotomies in Mental Health Care?
The end of lobotomies didn’t mean the end of treatment. Instead, mental health care expanded in healthier ways:
-
Medication: Antidepressants, antipsychotics, and mood stabilizers became standard.
-
Therapy: Talk therapy, cognitive-behavioral therapy (CBT), and family counseling grew popular.
-
Community care: Many patients left large institutions for outpatient and community-based support.
This new approach gave people dignity, choice, and better results. It shows why asking when lobotomies were made illegal is really about understanding how far mental health care has come.
The Cultural Impact of Lobotomies
Lobotomies left a mark not just on medicine but on culture. Books, movies, and documentaries often reference them as symbols of medical cruelty. One Flew Over the Cuckoo’s Nest is one of the most famous examples, showing the lobotomy as a punishment for nonconformity.
These cultural portrayals kept public memory alive, ensuring lobotomies would not quietly fade into history. Instead, they became a cautionary tale about the dangers of unchecked medical power.
Lessons for Today’s Mental Health Care
Looking back, the lobotomy era teaches us several lessons:
-
Desperation can lead to risky solutions.
-
New treatments must be tested carefully before being widely adopted.
-
Patient rights should always come first.
-
Hope should never replace evidence.
These lessons help guide today’s medical professionals. They remind us that when we ask when lobotomies were made illegal, we’re also asking how to prevent similar mistakes in the future.
FAQs About Lobotomies
1. When were lobotomies made illegal in the United States?
They were never formally outlawed nationwide but fell out of practice by the late 1960s–1970s due to ethical concerns and better treatments.
2. Did any country officially ban lobotomies?
Yes, some countries placed strict legal restrictions. For example, the UK’s Mental Health Act of 1983 required approval before psychosurgery.
3. How many people had lobotomies?
Around 40,000 in the United States and more than 50,000 worldwide underwent lobotomies before the practice ended.
4. Did lobotomies ever actually work?
Some patients became calmer, but most suffered severe side effects, including personality loss, disability, or death.
5. Are lobotomies and psychosurgery the same thing?
No. Lobotomies were crude brain cuts, while modern psychosurgery uses advanced, targeted methods and strict ethics.
6. Why do people still ask “when were lobotomies made illegal”?
Because the practice was never banned everywhere at once, the timeline varies by country, making it a complex historical question.
Conclusion: Why This History Still Matters
So, when were lobotomies made illegal? The real answer is that they were never fully outlawed in every place at once. Instead, they slowly disappeared as society recognized the harm they caused and embraced safer, more compassionate treatments.
The story of lobotomies is a warning about what happens when desperation outruns science. It shows the importance of ethics, patient rights, and constant learning in medicine.
As we continue to face mental health challenges today, remembering this history helps us stay humble, careful, and hopeful. After all, medicine is not just about curing illness it’s about protecting human dignity.


Lighting and AV: Elevating Your Trade-Show Booth Experience
In the competitive environment of trade shows, grabbing attention and keeping it is essential. With dozens or even hundreds of...


Ride in Style: Why Every Couple Deserves a Wedding Limo Toronto
Your wedding day is one of the most memorable days of your life and every moment deserves a touch of...


Revolutionize Garden Care with Aiper Store Australia Irrigation Controllers
The contemporary homeowner is gradually resorting to technology to ease the maintenance of the gardens. Aiper Store Australia has an...


Sales Reps No Longer Required: Outscaled’s Framework Closes Clients Without the Close
Outscaled is challenging the very foundation of traditional sales teams with a framework that eliminates the need for discovery calls,...


Mastering Mindfulness: Techniques for Inner Peace
Mindfulness is a mental practice that emphasizes being present in the moment, fully engaging with one’s thoughts, feelings, and surroundings...


The True Cost of Lawn Care: Budgeting for a Beautiful Yard
When embarking on a lawn care project, the initial costs can often be a significant factor in determining the overall...


Starting Strong: Choosing the Right Pickleball Paddle for New Players
Pickleball has become one of the fastest-growing sports in the country, attracting people of all ages with its mix of...
-
 Technology3 years ago
Is Camegle Legit Or A Scam?
-
 Travel3 years ago
NEW ZEALAND VISA FOR ISRAELI AND NORWEGIAN CITIZENS
-
 Technology3 years ago
RNDcoin: Korea’s first blockchain project and a world-class cryptocurrency
-
 Uncategorized3 years ago
AMERICAN VISA FOR NORWEGIAN AND JAPANESE CITIZENS
-

 Fashion1 year ago
Goda Perfume Reviews: Is It Worth Your Investment?
-
Lifestyle1 year ago
A Guide to Silverdaddies: What You Need to Know
-
 Health3 years ago
Health Benefits Of Watermelon
-

 Home Improvement8 months ago
Artificial Grass Designs: Perfect Solutions for Urban Backyards