
Blog
Common Maintenance Practices for Shearing Machines:

1. Daily Inspection and Cleaning:
Check your shearing machine every day. Clean it on a regular basis. This keeps it in good shape. Before starting the machine each day:- Check for any visible signs of wear or damage on the blades, hold-downs, and back gauge.
- Wipe down all accessible surfaces to remove metal shavings, dust, and oil residue.
- Ensure all safety guards and emergency stops are functional and properly in place.
2. Lubrication:
You should never overlook lubrication, as it is a vital maintenance task. It minimizes friction between moving parts and helps prevent premature wear. Depending on your machine type, lubrication points may include:- Guide rails
- Bearings
- Cylinders
- Slideways
3. Blade Maintenance and Sharpening:
Blades are key to a shearing machine. Their condition affects cut quality directly. Dull or chipped blades hurt the workpiece’s finish. They also put extra strain on the motor and hydraulic system. Best practices include:- Checking blade clearance daily.
- Rotating or flipping blades is a double-edged sword.
- Scheduling periodic sharpening depending on usage volume.
4. Hydraulic System Care:
For hydraulic shearing machines, the hydraulic system must be monitored closely. A failure here can bring production to a complete stop. Key maintenance tasks include:- Checking hydraulic oil levels weekly.
- Replace the hydraulic oil every 6 to 12 months, or as recommended.
- Inspecting hoses and connectors for leaks or cracks.
- Cleaning or replacing hydraulic filters as needed.
5. Backgauge Calibration:
The backgauge ensures accurate and consistent cut lengths. It should be inspected and calibrated to avoid costly material waste. Operators should:- Verify the back gauge position against a standard measuring tool.
- Tighten any loose bolts or misalignments.
- Check for mechanical wear in gears and drive mechanisms.
6. Electrical Components and Control Panel:
The control panel is the brain of the machine. Keeping it in good condition ensures smooth operation and reliable performance. You should:- Inspect the wiring and terminals for signs of wear or overheating.
- Test the limit switches and sensors.
- Check the CNC system for software updates or bugs.
- Clean the panel with dry air or an antistatic cloth to avoid dust buildup.
7. Fastener and Alignment Checks:
Check bolts, nuts, and machine alignments monthly. Vibrations and heavy use can gradually loosen fasteners or misalign critical components. Failure to address these issues can result in poor-quality cuts or mechanical failure.- Use a torque wrench to retighten key bolts.
- Align blades and squaring arms to the machine’s table.
- Check for vibrations during operation and identify their source.
8. Operator Training and Record Keeping:
Even the most well-maintained machines can suffer if operated improperly. Invest in proper training for all machine operators to ensure they:- Understand safety protocols.
- Follow startup and shutdown procedures.
- Know how to recognize signs of mechanical stress or failure.
Conclusion:
Regular maintenance is key for your shearing machine. It helps boost performance, ensure safety, and extend its lifespan. Daily inspections, lubrication, hydraulic care, and electrical checks all matter. Each step helps operations run better and improves quality. Keeping equipment in good shape is crucial for long-term success. This applies to manual models and advanced CNC machines from a hydraulic CNC shearing machine factory. Use these best practices and buy quality machines from trusted brands like miharmle. This choice leads to smoother operations and a good return on your investment.
Introduction
Planning a wedding can be exciting but also overwhelming. One key element that can make your big day unforgettable is wedding tent decoration. A well-decorated tent can set the perfect mood, whether it’s elegant, rustic, or whimsical. From lights to flowers, fabric drapes to centerpieces, every detail contributes to creating a magical atmosphere. In this guide, we’ll explore how to elevate your wedding tent and make your outdoor celebration truly memorable.
Why Wedding Tent Decoration Matters
A wedding tent is more than just a shelter from the sun or rain. It’s a blank canvas for creativity. With the right decorations, your tent can become a centerpiece of your wedding theme. Proper decoration also enhances photos, creates a welcoming space for guests, and adds a personal touch that reflects your style. From soft lighting to luxurious fabrics, every choice matters. Investing time and effort in your wedding tent decoration ensures your event feels unique and special.
Choosing the Right Tent for Your Wedding
Before diving into decoration, selecting the right tent is essential. There are several types, including frame tents, pole tents, and clear-top tents. Consider your guest list, venue size, and weather conditions. Clear-top tents are perfect for starlit evenings, while frame tents offer more flexibility in layout. Once you choose your tent, it becomes easier to plan decorations that complement its style. A well-chosen tent lays the foundation for stunning wedding tent decoration.
Setting a Theme for Your Wedding Tent
Choosing a theme simplifies your decoration choices. Popular themes include rustic chic, garden party, bohemian, and classic elegance. A rustic theme may feature burlap table runners, wooden signs, and string lights. For bohemian vibes, think macramé, colorful rugs, and hanging lanterns. Aligning decorations with your theme ensures a cohesive and visually appealing look inside your tent. Remember, every element contributes to the overall experience for your guests.
Drapery and Fabric Ideas
Drapery is one of the most transformative aspects of wedding tent decoration. Flowing fabrics can soften the tent structure, add elegance, and create romantic corners. Sheer fabrics like tulle or chiffon are popular for their light, airy feel. You can also layer colors to match your theme or use bold hues for a dramatic effect. Ceiling drapes, side panels, and fabric swags can be accented with fairy lights or greenery for a dreamy look.
Lighting to Set the Mood
Lighting plays a crucial role in creating ambiance. Fairy lights, chandeliers, and lanterns can turn a simple tent into a glowing, magical space. Warm string lights add intimacy, while crystal chandeliers bring glamour. For outdoor weddings, consider solar-powered lanterns or LED uplighting around the tent perimeter. Don’t forget accent lighting for key areas like the dance floor or dining tables. Thoughtful lighting enhances every photo and adds warmth to your celebration.
Floral Arrangements and Greenery
Flowers bring life, color, and fragrance to your tent. Choose seasonal blooms that match your color scheme for cost-effective beauty. Hanging floral installations or garlands can create a “wow factor” above dining areas or the dance floor. Complement flowers with greenery, such as eucalyptus or ferns, for a natural, fresh look. Your floral choices should feel cohesive with your overall wedding theme, creating an inviting and Instagram-worthy environment.
Tablescapes and Centerpieces
Tablescapes are the perfect opportunity to showcase your creativity. From elegant candles to bold floral arrangements, centerpieces tie the tent decor together. Use varying heights to add dimension, and mix textures like wood, glass, or metallic accents. Personalized touches, like custom name cards or thematic napkins, enhance guest experience. Well-thought-out tablescapes make dining under the tent both beautiful and memorable.
Furniture and Seating Arrangements
Comfortable seating is essential for a successful event. Choose furniture that matches your wedding style: rustic wooden chairs for countryside charm or elegant chiavari chairs for sophistication. Lounge areas with sofas and coffee tables provide cozy spaces for guests to relax. Don’t forget practical considerations like spacing for movement, dance floor placement, and accessibility. Thoughtful furniture placement enhances both the look and functionality of your tent.
Incorporating Personal Touches
Adding personal elements makes your wedding tent decoration truly special. Custom signs, photo displays, or favorite quotes can make guests feel more connected. Consider unique table favors or memory corners where loved ones can leave messages. Personal touches show thoughtfulness and make your wedding feel intimate, even in a large tented setting. These details often leave a lasting impression on your guests.
Budget-Friendly Wedding Tent Decoration Ideas
Decorating a wedding tent doesn’t have to break the bank. DIY projects, such as paper lanterns, homemade garlands, or thrifted vases, can look stunning. Renting furniture, tents, and decor items is another cost-saving option. Focus on key elements like lighting, drapery, and centerpieces to maximize visual impact without overspending. Even on a budget, careful planning can create a luxurious and memorable tented wedding experience.
Safety and Practical Considerations
While aesthetics are important, safety should never be overlooked. Ensure tents are securely anchored, especially for outdoor weddings. Electrical setups for lighting must be handled by professionals. Provide pathways for easy movement, especially if elderly guests are attending. Also, consider weather contingencies like heaters for cold evenings or fans for hot days. A beautiful wedding tent decoration is even better when it’s safe and comfortable for everyone.
FAQs About Wedding Tent Decoration
1. How can I make a small tent feel spacious?
Use light-colored fabrics, vertical drapes, and strategic lighting to create an airy, open feel. Mirrors can also visually expand the space.
2. What flowers work best for tent weddings?
Seasonal blooms, roses, peonies, and hydrangeas are popular. Mix greenery for texture and freshness.
3. How much should I budget for tent decoration?
Decor costs vary, but typically 15–25% of your overall wedding budget is allocated for decor, including lighting, florals, and fabrics.
4. Can I DIY my wedding tent decoration?
Yes! DIY projects like garlands, lanterns, or table centerpieces can save money while adding a personal touch.
5. What lighting is best for evening tent weddings?
String lights, fairy lights, and chandeliers create warm, romantic vibes. Accent areas like tables and dance floors for impact.
6. How early should I start planning tent decorations?
Start at least 3–6 months before your wedding. This ensures ample time for rentals, DIY projects, and vendor coordination.
Conclusion: Make Your Wedding Tent Truly Magical
Your wedding day deserves a stunning, memorable setting, and a beautifully decorated tent can make that happen. From lighting to flowers, drapery to tablescapes, each element contributes to a cohesive, magical experience. With thoughtful planning, attention to detail, and a touch of creativity, your wedding tent decoration can leave a lasting impression on everyone. Start envisioning your dream tent today and turn it into a celebration your guests will never forget.
Introduction
Writing about our fathers can be one of the most personal and meaningful exercises. Fathers play a special role in our lives they are our first heroes, teachers, and supporters. Many children are asked to write a short essay about their father, sometimes in just 10 lines. While this may seem simple, capturing the love, guidance, and wisdom a father provides can be challenging. In this article, we’ll explore how to write a “my father essay 10 lines” in an engaging and creative way. We’ll also provide tips, examples, and ideas to help students express their feelings naturally. Whether it’s for school, competitions, or personal reflection, this guide ensures your essay is original, heartfelt, and meaningful.
Why Writing About Your Father Matters
Writing about your father is more than just a school task. It helps children understand their father’s contributions, sacrifices, and love. When we describe our fathers, we reflect on their qualities, such as kindness, strength, and guidance. This exercise encourages gratitude and emotional expression. A “my father essay 10 lines” can be short but meaningful, teaching kids how to convey powerful ideas in simple words. By focusing on everyday actions, such as helping with homework, sharing life lessons, or offering support during tough times, children learn to value the people around them more deeply.
Tips to Write a Perfect “My Father Essay 10 Lines”
-
Start with a strong introduction – Mention your father and his role in your life.
-
Use simple words – Make your essay easy for anyone to read and understand.
-
Highlight key qualities – Include traits like honesty, hard work, and love.
-
Share personal experiences – Give examples of how your father helped or guided you.
-
Be honest and heartfelt – Genuine feelings make your essay trustworthy and relatable.
-
End with gratitude – Show appreciation for all that your father does.
Using these tips ensures your my father essay 10 lines is clear, engaging, and personal.
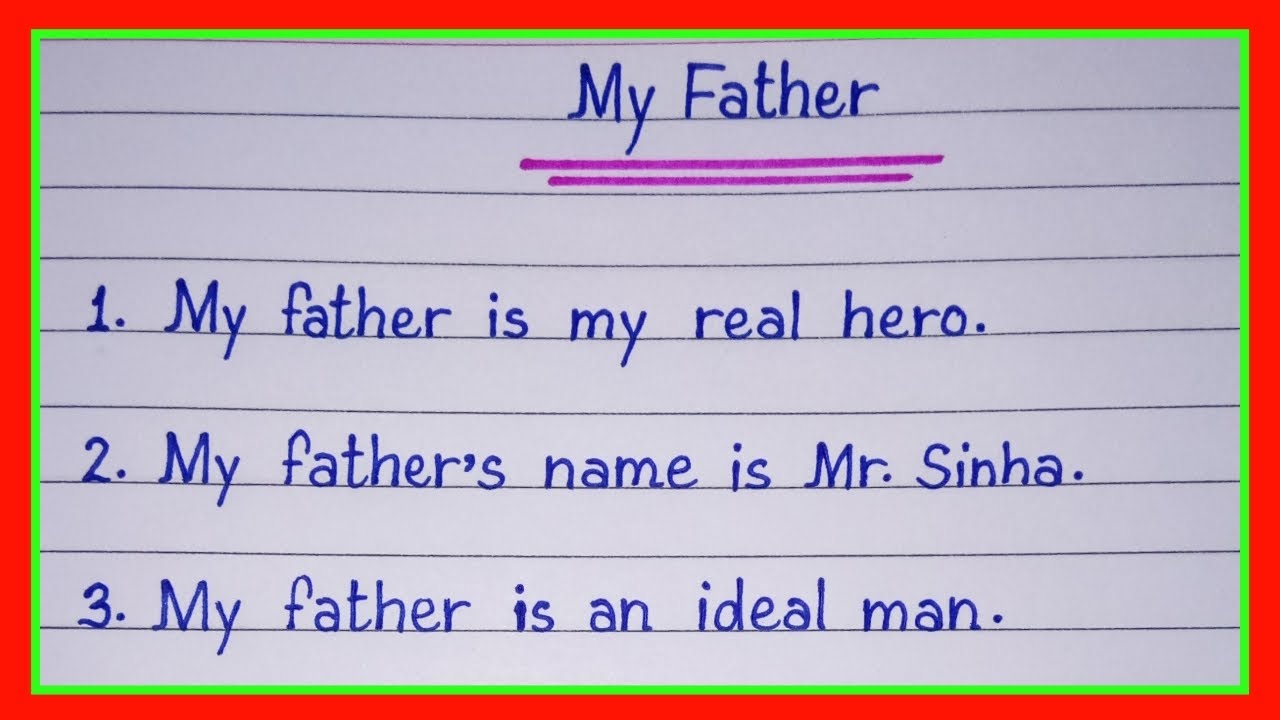
Examples of My Father Essay 10 Lines
Here’s a simple example you can use as a reference:
-
My father is my hero and guide in life.
-
He is kind, loving, and always cares for me.
-
He wakes up early and works hard to support our family.
-
He teaches me valuable lessons about honesty and respect.
-
My father helps me with my studies whenever I am confused.
-
He encourages me to follow my dreams and never give up.
-
He spends quality time with me and shares fun stories.
-
My father protects me from harm and keeps me safe.
-
He is my role model and the strongest person I know.
-
I am proud of my father and love him very much.
This simple structure makes it easy for children to write their own essay while reflecting their emotions.
Qualities of a Good Father
A father’s qualities go beyond providing material needs. Compassion, patience, and guidance are just as important. A good father teaches values, listens to problems, and encourages learning. Children writing a my father essay 10 lines can include qualities like:
-
Hardworking: Supporting the family with dedication.
-
Caring: Always thinking about the children’s well-being.
-
Honest: Leading by example.
-
Patient: Understanding mistakes and guiding gently.
-
Supportive: Encouraging dreams and ambitions.
Including these qualities makes the essay richer and more meaningful.
Personal Experiences to Include
Sharing real-life stories enhances the authenticity of your essay. Think of moments when your father helped you or made you feel loved. Examples can include:
-
Teaching you how to ride a bicycle.
-
Helping with homework or school projects.
-
Taking you to your favorite park or outing.
-
Giving advice during tough times.
Even small moments can show your father’s impact and strengthen your my father essay 10 lines.
Common Mistakes to Avoid
While writing your essay, avoid these common errors:
-
Being too general: Avoid vague phrases like “my father is good.”
-
Keyword stuffing: Use “my father essay 10 lines” naturally, not excessively.
-
Ignoring personal touch: Essays feel flat without real examples.
-
Overcomplicating words: Use simple, clear language suitable for children.
Focusing on clarity, sincerity, and personal connection makes your essay effective and enjoyable.
Fun Ways to Enhance Your Essay
You can make your essay engaging with creative touches:
-
Add drawings or illustrations related to your father.
-
Include short dialogues or quotes your father often says.
-
Describe favorite activities with your father, like playing or cooking.
These small elements can make your my father essay 10 lines stand out in school competitions or class presentations.
Writing a Longer Essay Inspired by 10 Lines
The 10-line essay can be a foundation for a longer essay. Expand each line into a paragraph, explaining the example or story behind it. For example, “My father helps me with my studies” can become a 150-word paragraph describing a specific study session and how he guided you. This method ensures your essay grows naturally while staying heartfelt and original.
The Role of Fathers in Modern Life
Today, fathers play more active roles than ever. Beyond financial support, fathers are partners in parenting, nurturing, and emotional development. Including observations about modern fatherhood adds depth to your my father essay 10 lines. Discuss how fathers help with household chores, spend time on education, or participate in hobbies with children. This reflection makes your essay relatable to contemporary readers.
Writing Style and Language Tips
-
Keep sentences short and straightforward.
-
Use active voice for clarity.
-
Add adjectives that describe emotions (loving, caring, patient).
-
Include a mix of examples and reflections.
Following these writing tips ensures your essay is easy to read, engaging, and human-like.
Frequently Asked Questions (FAQs)
Q1. How long should a “my father essay 10 lines” be?
A: Each line can be 8–15 words. Overall, 80–150 words is ideal for short essays.
Q2. Can I include stories in 10 lines?
A: Yes! Brief examples make the essay relatable and heartfelt.
Q3. How do I use the focus keyword naturally?
A: Mention my father essay 10 lines in the introduction, conclusion, and a few headings.
Q4. Can I make it funny or emotional?
A: Absolutely. Humor and emotions make your essay memorable.
Q5. Should I write in first person?
A: Yes. First-person writing connects readers to your personal experiences.
Q6. Is it okay to describe daily routines?
A: Definitely. Small daily actions highlight your father’s love and care.
Conclusion
Writing a my father essay 10 lines is a beautiful way to express love, respect, and gratitude toward fathers. By using simple words, sharing personal stories, and highlighting key qualities, children can create an original and heartfelt essay. Remember, every father has a unique story, and capturing that uniqueness adds authenticity and trustworthiness. Start with short, meaningful sentences, expand with examples, and don’t forget to add your own reflections. Your essay can inspire classmates, teachers, and even your father himself. Celebrate your father’s role in your life through words, and let your essay become a small tribute to his love and guidance.

Introduction — Meet Alfred McArthur
Alfred McArthur is a name that shows up in books, music, and media. People often see the name in many different places. That can make it hard to know which person is being talked about. This article helps clear up the confusion. It explains who Alfred McArthur might be, highlights creative works, and shows how to separate one person from another with the same name. The goal is to keep things simple, clear, and engaging for every reader.
Who is Alfred McArthur?
Alfred McArthur is not just one person. The name belongs to several creators across different fields. Some Alfred McArthurs are authors. Others are musicians. A few are filmmakers or media creators. Because of this, the same name can appear in many public listings. That is why people sometimes get confused. The best way to know which Alfred McArthur is being referred to is by looking at context. For example, a book cover usually points to an author, while an album page belongs to a musician.
Why the same name shows up a lot
Names are often shared by many people. Alfred McArthur is one such name. One Alfred may publish books, another may release songs, and another may create films. Public databases, music platforms, and online stores can list all of these people side by side. This makes it easy to confuse one for another. To avoid mistakes, look at the kind of work being shown. If it’s a digital book, that is the author. If it’s a streaming album, that is the musician.
Alfred McArthur — The author
One Alfred McArthur appears as an author of fiction and thrillers. His books are listed on online bookstores and can be found in digital form. These stories often focus on suspense, mystery, and dramatic themes. Each book includes short chapters and fast-paced writing that keeps readers hooked. If you see a book with this name on the cover, it likely belongs to this author’s collection. Checking the publication details helps confirm that it is indeed the same Alfred McArthur.
Books and editions
When you find a book by Alfred McArthur, it’s a good idea to double-check the details. Look at the title, publisher, and release year. Many books also include ISBN numbers that make them easier to track. Retailer author pages usually show other books written by the same person. Reading reviews or book samples also helps confirm an author’s style. This step is simple but prevents confusion between different people with the same name.
Alfred McArthur — The musician
Another Alfred McArthur is known as a musician. This artist has released songs and an album available on streaming platforms. Fans can listen to his tracks, follow his style, and explore different musical projects. The artist page often includes pictures, album details, and sometimes links to related work. By listening to the songs, it becomes clear which Alfred McArthur is the musician and not the writer.
Music discography and style
The music attributed to Alfred McArthur includes modern production and catchy melodies. Some tracks are upbeat, while others are slower and more emotional. Albums list multiple tracks, showing the artist’s range of style. Playlists and release years often appear on music platforms, helping fans follow the musician’s journey. This Alfred McArthur uses his art to connect with listeners in a creative and engaging way.
Alfred McArthur — The filmmaker and creator
In addition to authors and musicians, there are creators named Alfred McArthur who work in film and media. These people often gather their work on portfolio sites or hub pages. Filmmakers typically share credits, short videos, or project notes. This helps separate them from the writer or musician. By looking at a project’s details, fans can see whether this Alfred McArthur is behind a film, a documentary, or another visual piece.
Early life and background
When it comes to common names, it’s important to avoid mixing details. Unless an Alfred McArthur has shared a verified biography, personal information such as birthplace, schools, or family details can belong to different people with the same name. Reliable sources include author bios, artist websites, or professional interviews. Without those, it’s best to focus on confirmed public works rather than guess about personal details.
Career highlights
Each Alfred McArthur builds a career in a unique way. For the author, the highlights are published books that reach readers around the world. For the musician, the highlights are albums, streaming plays, and possibly live shows. For the filmmaker, the highlights include film credits and media projects. These achievements are proof of their work and show how each one contributes something different under the same name.
Themes and styles in books
The books written by Alfred McArthur often explore action, suspense, and conflict. They are written in a style that is easy to read and keeps the reader engaged. Short chapters, quick pacing, and dramatic storylines make them enjoyable for fans of thrillers. By noticing patterns in storytelling, readers can connect the works to the same author, even when other people share the name.
Themes and style in music
The music created by Alfred McArthur blends modern sounds with expressive lyrics. His songs carry themes of love, life, and personal journeys. The tracks are produced with a professional sound, and some may include collaborations with other musicians. Fans often enjoy the variety and the emotional impact of the music. This creative style sets him apart from others with the same name.
Social presence and official pages
Like many modern creators, Alfred McArthurs use social media to share their work. Authors may share book updates. Musicians may post songs and concert news. Filmmakers may upload clips and behind-the-scenes material. Official social accounts are the best way to keep up with new releases. They also help fans avoid confusion and ensure they are following the correct Alfred McArthur.
Legacy and influence
The legacy of Alfred McArthur is found in his creative works. Books leave a lasting mark on readers. Music reaches listeners and builds emotional connections. Films tell stories that stay with audiences. The name may be shared by many, but each creator adds a unique voice to the arts. Their influence grows with every new project, review, and performance.
Researching the right Alfred McArthur
If you want to research Alfred McArthur, start with the work. Look at the type of product book, song, or film. Then follow the official creator page linked to it. Retailers, streaming services, and professional sites often have reliable details. Always check more than one source before assuming identity. This ensures you are learning about the right person.
Practical tips for creators
The story of Alfred McArthur gives lessons for other writers and artists. First, keep your online presence clear and consistent. Use one main hub for fans to find your work. Add professional bios, accurate credits, and updated information. Share samples of your work to help audiences connect. By building a strong online identity, you make it easier for people to discover and support your projects.
Frequently Asked Questions
1. Who is Alfred McArthur?
Alfred McArthur can refer to several different people. Some are authors, others are musicians, and some work in film or media. The best way to know which one you’ve found is by looking at context.
2. Are all Alfred McArthurs the same person?
No. The same name is used by different people. An author, a musician, and a filmmaker all use this name in public listings.
3. What books has Alfred McArthur written?
Alfred McArthur has written thrillers and modern fiction titles. The stories are fast-paced and often focus on suspense and action.
4. Where can I listen to Alfred McArthur’s music?
You can find his songs and albums on major music streaming platforms. These include complete albums and single tracks.
5. How can I follow or contact Alfred McArthur?
That depends on which one you mean. Authors often list publishers or newsletters. Musicians and filmmakers usually share updates on social media or portfolio sites.
6. Is there a famous historical Alfred McArthur?
While the name appears in records, there is no single widely known historical figure with this exact name. Most references are to modern creators.
Conclusion — What to Do Next
Alfred McArthur is a name that belongs to more than one creative person. Whether you are reading a thriller, streaming a song, or watching a film, the name may appear. The best way to avoid confusion is to focus on the work itself and follow the official pages of the creator you enjoy. If you find a book you like, look for more by that author. If you enjoy the music, check the artist page for new songs. Each Alfred McArthur has something unique to share, and their work is what truly matters.


Lighting and AV: Elevating Your Trade-Show Booth Experience
In the competitive environment of trade shows, grabbing attention and keeping it is essential. With dozens or even hundreds of...


Ride in Style: Why Every Couple Deserves a Wedding Limo Toronto
Your wedding day is one of the most memorable days of your life and every moment deserves a touch of...
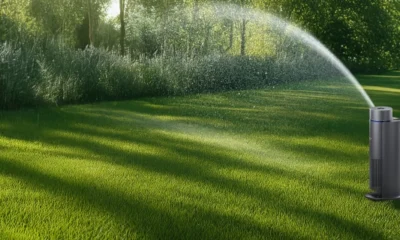

Revolutionize Garden Care with Aiper Store Australia Irrigation Controllers
The contemporary homeowner is gradually resorting to technology to ease the maintenance of the gardens. Aiper Store Australia has an...


Sales Reps No Longer Required: Outscaled’s Framework Closes Clients Without the Close
Outscaled is challenging the very foundation of traditional sales teams with a framework that eliminates the need for discovery calls,...


Mastering Mindfulness: Techniques for Inner Peace
Mindfulness is a mental practice that emphasizes being present in the moment, fully engaging with one’s thoughts, feelings, and surroundings...


The True Cost of Lawn Care: Budgeting for a Beautiful Yard
When embarking on a lawn care project, the initial costs can often be a significant factor in determining the overall...


Starting Strong: Choosing the Right Pickleball Paddle for New Players
Pickleball has become one of the fastest-growing sports in the country, attracting people of all ages with its mix of...
-
 Technology3 years ago
Is Camegle Legit Or A Scam?
-
 Travel3 years ago
NEW ZEALAND VISA FOR ISRAELI AND NORWEGIAN CITIZENS
-
 Technology3 years ago
RNDcoin: Korea’s first blockchain project and a world-class cryptocurrency
-
 Uncategorized3 years ago
AMERICAN VISA FOR NORWEGIAN AND JAPANESE CITIZENS
-
Lifestyle1 year ago
A Guide to Silverdaddies: What You Need to Know
-

 Fashion1 year ago
Goda Perfume Reviews: Is It Worth Your Investment?
-
 Health3 years ago
Health Benefits Of Watermelon
-

 Home Improvement8 months ago
Artificial Grass Designs: Perfect Solutions for Urban Backyards