
Home Improvement
Tips in Removing Orange Juice Stains on the Carpet
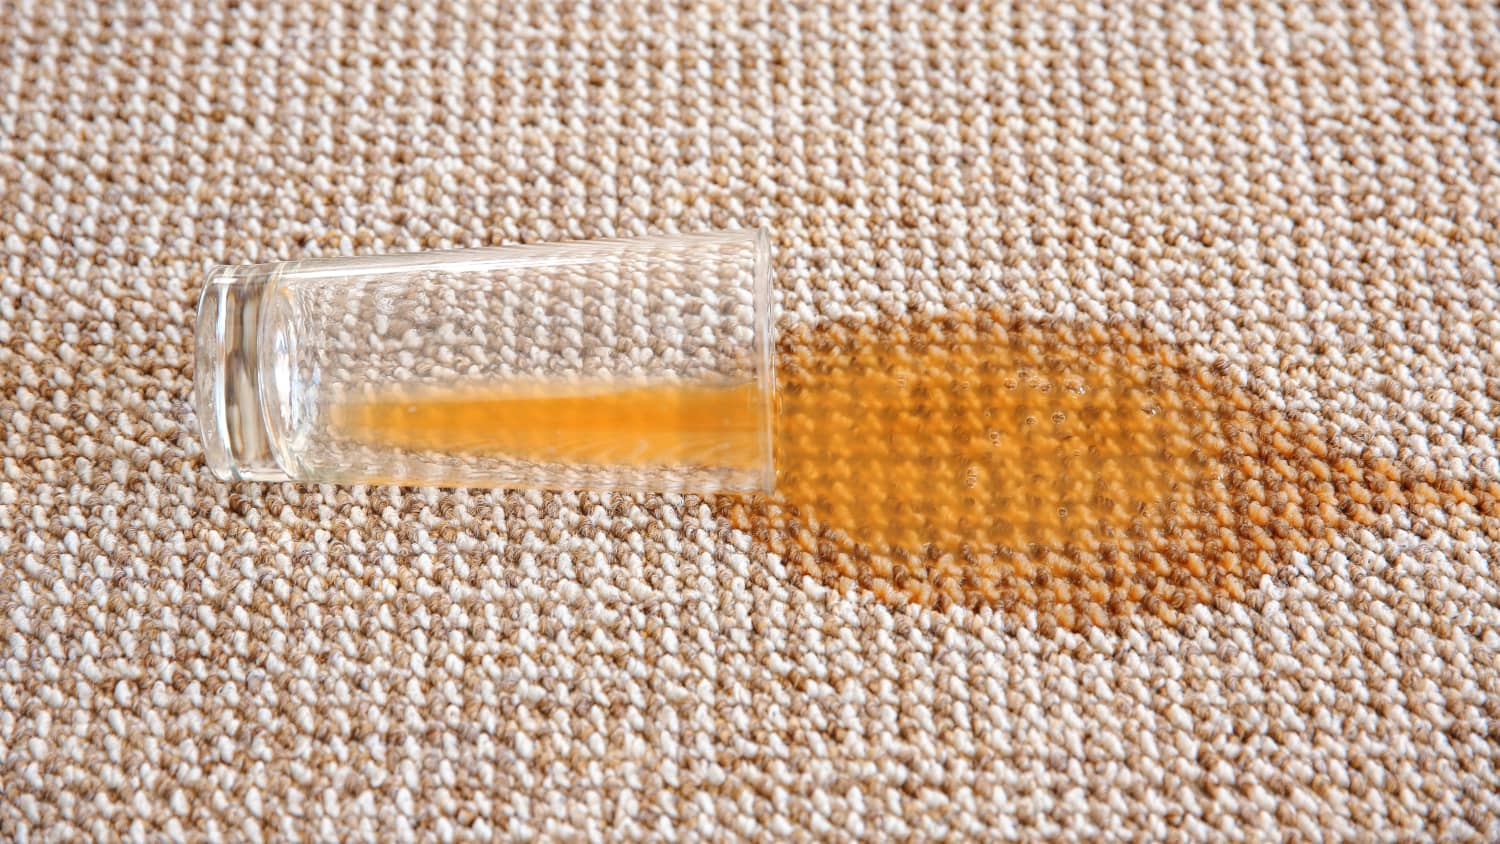
If you want to rejuvenate, nothing beats chilled orange juice. This refreshing drink is enjoyed by beach and tropical island vacationers, but it can also be enjoyed in the comfort of your own home. Many orange juice drinks are now available in most supermarkets. Please, try it.
However, if you accidentally spill orange juice on your carpet, it can cause problems. This is because orange juice not only causes stains, but it also makes carpets sticky and lumpy.
Dealing with a orange juice stain on your carpet is no joke, but thankfully there are steps you can take to fix it. Here are some steps to help you clean carpet stains at home.
Soak up any orange juice that splattered on the carpet with a clean sponge.
Instead of trying to clean it, it should be cleaned quickly and carefully to avoid spills on the carpet.
Remove unsightly stains from carpet using a 4:1 mixture of pure ammonia and lukewarm water. This homemade cleaning solution can serve as an alternative to commercial cleaners and help ensure that stains are removed.
Apply a few drops of the cleaning solution from the previous step to the orange juice stain on the carpet. Let it sit for a few minutes, then gently wipe the carpet clean with a clean white cloth. The stain will slowly rise from the carpet fibers to the surface of the fabric. Continue doing this until the stain is completely gone.
The stain will disappear after the previous step, but be careful not to leave marks on the carpet fibers. This is something you should never forget as you don’t want to risk the residue that slowly builds up on your carpet over time. dry completely.
Carpet care is a constant concern of every homeowner.
Because many of the cleaning challenges we are exposed to on a daily basis can leave our carpets dirty. It’s just a small part.
Leaks can be very problematic as they cause stains and make the carpet dirty and unsightly. Also, accidents in the home are so common that they happen often. An example of a cleaning problem that many people face is orange juice stains on carpets.
Orange juice is he one of the most consumed juices in the world.
It’s very delicious and good for your body, so it’s a very easy drink to drink. But spilling liquids on your carpet can be a disaster. If you don’t know how to clean orange juice stains from your carpet, follow these simple steps.
Use a clean sponge or paper towel to absorb as much orange juice as possible into the carpet. Do this immediately to prevent the sap from seeping deeper into the carpet.
Take a cotton ball and make an isopropyl scrub.
Then gently dab the affected area on the carpet. This will remove some of the stain and prevent it from settling in too quickly.
Next, use household items to create a cleaning solution that will help remove the stain. A teaspoon of pure ammonia mixed with a glass of warm water creates a highly effective cleaner that breaks down dirt.
Use a formulated cleaning solution on soiled areas of the carpet.
Then take a clean white cloth and wipe the affected area repeatedly. When you start blotting, you will notice that the stain becomes lighter as it transfers to the surface of the fabric. Continue doing this until all the stain is removed.
Use a glass of clean water to wash off any residue left on the carpet. Then dry everything with a wet/dry vacuum to finish the job.

Introduction
When you spot a cockroach scurrying across your kitchen floor, panic sets in fast. You grab the nearest weapon often a can of Lysol sitting on your counter. But does this everyday disinfectant actually does lysol kill roaches, or are you just wasting your time and product?
Many homeowners turn to Lysol as a quick roach-killing solution because it’s readily available and feels like it should work. After all, if it can kill germs and bacteria, surely it can handle a bug, right? The reality is more complicated than you might expect.
Understanding whether Lysol kills roaches requires looking at how these resilient pests function, what Lysol is designed to do, and why the two don’t always match up perfectly. More importantly, you need to know what actually works when dealing with a roach problem because the wrong approach can make your infestation worse.
Understanding Roaches: Nature’s Ultimate Survivors
Cockroaches have survived for over 300 million years, outlasting dinosaurs and adapting to nearly every environment on Earth. This incredible resilience comes from several key factors that make them notoriously difficult to kill.
Built-in Defense Systems
Roaches possess an exoskeleton a hard, protective outer shell that shields their internal organs from many threats. This natural armor protects them from physical damage and creates a barrier against many chemical substances that would easily kill other insects.
Their respiratory system also works differently than mammals. Instead of breathing through their mouths, roaches absorb oxygen through small openings called spiracles located along their bodies. This means substances that might suffocate other creatures don’t affect them the same way.
Speed and Evasion
A cockroach can run up to three miles per hour and change direction 25 times per second. When you spray Lysol, most roaches will simply run away before the product can take full effect. Their quick reflexes and ability to squeeze into impossibly small spaces mean they often escape before any cleaning product can do real damage.
What is Lysol? Breaking Down the Formula
Lysol is primarily designed as a disinfectant and cleaning product, not an insecticide. Understanding its ingredients helps explain why it has limited effectiveness against roaches.
Active Ingredients
Most Lysol products contain ethanol (ethyl alcohol) as their main active ingredient, typically ranging from 50-80% concentration. Some formulations also include benzalkonium chloride or other quaternary ammonium compounds designed to kill bacteria, viruses, and fungi.
How Lysol Works
The alcohol in Lysol denatures proteins and dissolves lipids in microorganisms, effectively destroying bacteria and viruses on contact. It’s designed to break down cell walls of microscopic organisms not the complex biological systems of insects like cockroaches.
The product works best on hard, non-porous surfaces where it can maintain contact with germs long enough to be effective. This controlled environment doesn’t exist when you’re spraying a moving target like a cockroach.
Does Lysol Kill Roaches? The Honest Answer
Lysol can kill roaches, but not reliably or effectively. Here’s what actually happens when you spray a cockroach with Lysol.
Immediate Effects
Direct contact with Lysol can cause immediate irritation to a roach’s respiratory system and exoskeleton. The alcohol content may cause some tissue damage, and the roach might appear to slow down or become disoriented.
In some cases, particularly with smaller roaches or nymphs, a heavy dose of Lysol applied directly can be fatal. The alcohol can penetrate their smaller, less developed exoskeletons more easily than adult roaches.
Why It Usually Doesn’t Work
The concentration of alcohol in Lysol isn’t high enough to consistently kill healthy adult cockroaches. While it may stun or temporarily disable them, most roaches will recover and continue about their business once the initial effects wear off.
Additionally, you need sustained contact for Lysol to be effective. Roaches move quickly and the spray evaporates rapidly, meaning there’s rarely enough exposure time for the product to be lethal.
The Bigger Problem
Even if Lysol kills the roach you can see, it does nothing to address the colony hiding in your walls. Cockroaches are social insects that live in large groups. For every roach you spot, there are likely dozens more nearby that your spray-and-pray approach won’t reach.
Alternative Solutions: What Actually Works Against Roaches
Instead of relying on household cleaners, focus on proven roach control methods that target the entire population.
Professional-Grade Baits
Gel baits containing fipronil or hydramethylnon are far more effective than any spray. Roaches consume the bait, return to their colony, and die. Other roaches then consume the contaminated roach, spreading the poison throughout the entire population.
Place gel baits in areas where you’ve seen roach activity: under sinks, behind appliances, and in dark corners. The slow-acting poison gives roaches time to share it with their colony before dying.
Boric Acid Solutions
Boric acid disrupts a roach’s digestive system and nervous system when ingested. Mix equal parts boric acid, flour, and sugar to create an effective homemade bait. The sugar and flour attract roaches while the boric acid provides the lethal component.
Apply thin layers in areas where pets and children won’t access it. Too much boric acid will repel roaches rather than attract them, so use a light touch.
Diatomaceous Earth
Food-grade diatomaceous earth damages roach exoskeletons through microscopic cuts, eventually leading to dehydration and death. Sprinkle thin layers in areas where roaches travel, such as along baseboards and under appliances.
This method works slowly but effectively, and it’s safe around pets and children when you use food-grade products.
Prevention Tips: Stop Roaches Before They Start
The most effective roach control happens before you ever see one. Focus on eliminating the three things roaches need: food, water, and shelter.
Eliminate Food Sources
Store all food in sealed containers, including pet food. Clean up crumbs immediately and don’t leave dirty dishes in the sink overnight. Pay special attention to areas behind appliances where food particles accumulate.
Roaches can survive on surprisingly little food—even the grease residue on your stove or crumbs under your refrigerator provide enough sustenance for a small colony.
Control Moisture
Fix leaking pipes, eliminate standing water, and use dehumidifiers in damp areas like basements. Roaches need water more than food, and eliminating moisture sources forces them to look elsewhere.
Don’t forget about less obvious water sources like plant saucers, pet water bowls left out overnight, and condensation around air conditioning units.
Seal Entry Points
Use caulk to seal cracks around pipes, electrical outlets, and baseboards. Install door sweeps and weather stripping to eliminate gaps. Remember that roaches can squeeze through spaces as thin as a dime, so even small openings need attention.
When to Call Professional Help
If you’re seeing roaches regularly despite your prevention efforts, it’s time for professional intervention. Pest control experts have access to stronger treatments and can identify problem areas you might miss.
Professional treatments typically involve multiple visits and a combination of baits, sprays, and monitoring devices. While more expensive than DIY methods, professional pest control addresses roach problems comprehensively rather than one bug at a time.
Consider professional help if you see roaches during daylight hours, find roach droppings in multiple rooms, or notice a musty odor that could indicate a large infestation.
FAQ
Can Lysol prevent roaches from coming back?
No, Lysol doesn’t provide residual protection against roaches. While it may kill some bacteria and reduce odors that attract roaches, it won’t prevent new roaches from entering your home.
Is it safe to spray Lysol directly on roaches?
Lysol is generally safe for household use, but avoid spraying it excessively in enclosed areas. The alcohol content can create strong fumes, and overuse may irritate your respiratory system.
What household items actually kill roaches instantly?
Very few household items kill roaches instantly. Boiling water can be effective but impractical for moving targets. Your best bet is combining immediate removal (vacuum them up) with long-term control methods like baits.
How do I know if a roach is really dead after spraying it with Lysol?
Roaches can appear dead while simply being stunned or temporarily disabled. A truly dead roach will be completely motionless and won’t respond to stimuli. When in doubt, dispose of the roach immediately rather than leaving it to potentially recover.
The Bottom Line: Skip the Lysol, Choose Better Solutions
While Lysol might kill the occasional cockroach under perfect conditions, it’s not a reliable or effective roach control method. You’re better off investing your time and money in proven solutions like gel baits, boric acid, and prevention strategies.
Focus on eliminating the conditions that attract roaches rather than trying to kill them one by one with household cleaners. A comprehensive approach that targets the entire colony will solve your roach problem permanently, while spraying Lysol at individual bugs will leave you frustrated and still dealing with an infestation.
Remember that effective pest control takes patience and consistency. The roach you see today represents a much larger problem hiding in your walls, and addressing that hidden population requires more sophisticated tools than what’s sitting in your cleaning cabinet.

Introduction
When it comes to choosing the perfect cutting board, most home cooks think wood or plastic are their only options. But there’s a third contender that’s been quietly winning over professional chefs and design-conscious home cooks alike: Corian cutting boards.
These solid surface cutting boards offer a unique combination of durability, hygiene, and aesthetic appeal that traditional materials simply can’t match. If you’ve been struggling with wooden boards that harbor bacteria or plastic ones that show every scratch, it might be time to discover what makes Corian cutting boards special.
In this comprehensive guide, we’ll explore everything you need to know about Corian cutting boards, from their impressive benefits to how to choose the right one for your kitchen. Whether you’re a serious home cook or simply want a cutting board that looks as good as it performs, you’ll find valuable insights to help make your decision.
What Is Corian and Why Does It Matter for Cutting Boards?
Corian is a solid surface material created by DuPont in the 1960s. Made from a blend of acrylic polymer and aluminum trihydrate, this non-porous material was originally designed for countertops and architectural applications. However, its unique properties make it an exceptional choice for cutting boards.
Unlike natural materials like wood, Corian has no grain or pores where bacteria can hide. This makes it inherently more hygienic than traditional cutting board materials. The material is also completely solid throughout, meaning it won’t delaminate or separate over time like some composite materials might.
The manufacturing process creates a uniform, dense surface that’s both durable and repairable. Small scratches and minor damage can often be sanded out, essentially restoring the cutting board to like-new condition. This longevity factor makes Corian cutting boards a smart investment for serious cooks.
The Compelling Benefits of Corian Cutting Boards
Superior Durability That Lasts for Years
Corian cutting boards are built to withstand heavy daily use. The solid surface material resists chipping, cracking, and warping that can plague wooden cutting boards over time. While plastic boards quickly develop deep grooves that trap food particles, Corian maintains its smooth surface much longer.
The material’s resistance to impact means you can use it confidently for heavy-duty tasks like breaking down large cuts of meat or chopping through dense vegetables. Many professional kitchens rely on Corian cutting boards precisely because they can handle the rigorous demands of commercial food preparation.
Unmatched Hygiene and Food Safety
Food safety should be a top priority in any kitchen, and this is where Corian cutting boards truly shine. The non-porous surface prevents bacteria from penetrating and multiplying within the material. This makes Corian cutting boards particularly valuable when working with raw meats or other potentially hazardous foods.
Studies have shown that non-porous cutting surfaces are easier to sanitize effectively compared to porous materials like wood. With proper cleaning, a Corian cutting board can be virtually bacteria-free after each use. This peace of mind is invaluable when preparing food for family and guests.
Aesthetic Appeal That Enhances Your Kitchen
Beyond functionality, Corian cutting boards offer impressive visual appeal. Available in dozens of colors and patterns, these cutting boards can complement any kitchen design scheme. From classic white and neutral tones to bold colors and stone-like patterns, there’s a Corian option to match your style.
The material’s ability to be fabricated into custom shapes and sizes means you can create a cutting board that perfectly fits your space and needs. Some homeowners even choose to have their Corian cutting boards match their countertops for a seamless, professional appearance.
How to Choose the Perfect Corian Cutting Board
Size Considerations for Your Kitchen
The right size cutting board depends on your cooking habits and available counter space. Larger boards provide more working room for big prep jobs, while smaller boards are easier to store and clean. Consider having multiple sizes for different tasks.
A good starting point is a board that’s at least 12 by 18 inches for general use. This provides enough space for most cutting tasks without overwhelming smaller kitchens. If you frequently prepare large meals or work with whole chickens or roasts, consider a board that’s 15 by 20 inches or larger.
Thickness Matters for Stability and Longevity
Corian cutting boards typically range from half an inch to two inches thick. Thicker boards offer better stability during use and can be resurfaced more times over their lifetime. However, they’re also heavier and more expensive.
For most home cooks, a three-quarter inch thick board provides an excellent balance of stability, durability, and practicality. Professional kitchens often prefer one-inch or thicker boards for their superior longevity under heavy use.
Color Selection: Practical and Aesthetic Considerations
While color is largely a matter of personal preference, there are practical considerations to keep in mind. Lighter colors show stains more easily but make it easier to see food particles during cleaning. Darker colors hide stains better but can make thorough cleaning more challenging.
Many professional chefs prefer white or light-colored cutting boards because they make cross-contamination easier to spot. However, if you’re planning to use your Corian cutting board as a serving piece, you might prioritize aesthetics over pure functionality.
Essential Care and Maintenance for Long-Lasting Performance
Daily Cleaning Best Practices
Proper cleaning is crucial for maintaining your Corian cutting board’s hygiene and appearance. After each use, wash the board with warm, soapy water and rinse thoroughly. For deeper cleaning, you can use a mild abrasive cleaner or a paste made from baking soda and water.
Avoid using harsh chemicals or bleach regularly, as these can potentially damage the surface over time. Instead, for periodic deep sanitization, use a solution of one part white vinegar to one part water, followed by thorough rinsing.
Removing Stains and Restoring Shine
One of Corian’s greatest advantages is its ability to be restored to like-new condition. Minor stains can often be removed with a paste of baking soda and water, gently rubbed in with a soft cloth. For tougher stains, try a commercial Corian cleaner or a mild abrasive cleaner.
Deeper scratches and more significant damage can be professionally repaired by sanding and polishing. Many Corian fabricators offer restoration services that can make an old cutting board look brand new again.
Preventing Damage and Extending Lifespan
While Corian is durable, proper care will extend its lifespan significantly. Always use appropriate knives and avoid cutting with excessive force. Don’t use your cutting board as a trivet for hot pots and pans, as extreme heat can damage the surface.
Store your cutting board in a way that prevents it from being scratched by other kitchen tools. Many people prefer to store their Corian cutting boards vertically to prevent items from being stacked on top of them.
Where to Find Quality Corian Cutting Boards
Online Retailers and Specialty Stores
Many online retailers offer Corian cutting boards in standard sizes and colors. Amazon, Williams Sonoma, and other major retailers often carry a selection of pre-made options. These are typically the most affordable way to get a Corian cutting board.
Specialty kitchen stores may offer a more curated selection and knowledgeable staff who can help you choose the right board for your needs. They may also offer maintenance products and advice for keeping your cutting board in top condition.
Custom Fabrication for Perfect Fit
For the ultimate in customization, consider having a Corian cutting board custom fabricated. Local countertop fabricators who work with Corian can create boards in any size, shape, or color you desire. This option costs more but allows for perfect integration with your kitchen design.
Custom fabrication also allows for special features like juice grooves, handles, or even integrated scales. If you have specific needs or want something truly unique, this route offers unlimited possibilities.
Frequently Asked Questions
Are Corian cutting boards safe for food preparation?
Yes, Corian cutting boards are completely food-safe. The material is non-toxic and non-porous, making it an excellent choice for food preparation. It’s approved by health departments for use in commercial kitchens.
How do Corian cutting boards compare to wood in terms of knife wear?
Corian is harder than most woods, which means it may cause knives to dull slightly faster. However, the difference is minimal for most home cooks. Regular knife sharpening will keep your blades in good condition regardless of cutting board material.
Can I put my Corian cutting board in the dishwasher?
While Corian can technically go in the dishwasher, it’s not recommended for large cutting boards due to size constraints and potential for damage from other items. Hand washing is the preferred method for cleaning Corian cutting boards.
How long do Corian cutting boards typically last?
With proper care, a quality Corian cutting board can last decades. The ability to sand out scratches and restore the surface means these boards can be renewed multiple times throughout their lifespan.
Are there any foods I should avoid cutting on Corian?
Corian cutting boards are suitable for all types of food preparation. However, be cautious with very acidic foods like lemons over extended periods, as they may cause slight dulling of the surface finish.
Making the Smart Choice for Your Kitchen
Corian cutting boards represent a significant upgrade from traditional materials for serious home cooks. The combination of hygiene, durability, and aesthetic appeal makes them an investment that pays dividends in both functionality and kitchen design.
While the initial cost may be higher than plastic or basic wooden cutting boards, the longevity and performance of Corian make it cost-effective over time. The ability to restore and refinish these boards means you’re likely buying the last cutting board you’ll ever need.
Consider your cooking habits, kitchen design, and long-term needs when making your decision. For most home cooks who value quality and performance, a Corian cutting board will exceed expectations and provide years of reliable service.

Introduction
Buying a home represents one of the largest investments most people will make in their lifetime. Before finalizing your purchase, a professional home inspection serves as your safety net, revealing potential issues that could cost thousands down the road. But if you’re scheduling your first inspection, you’re probably wondering: exactly how long will this process take?
The answer isn’t straightforward. A house inspection how long does it take between 2 to 4 hours, but this timeframe can vary significantly based on several key factors. Understanding what influences inspection duration will help you plan your day and set realistic expectations for this crucial step in the home-buying process.
Factors Affecting Inspection Time
Several variables determine how long your home inspection will take. Let’s explore the most significant factors that inspectors consider when estimating their time on-site.
Size of the Property
Property size plays the most obvious role in determining inspection length. A 900-square-foot condo requires far less time than a 4,000-square-foot estate. Inspectors must examine every accessible area, from basement to attic, which means more square footage directly translates to more inspection time.
Beyond just floor space, the number of rooms, bathrooms, and levels all contribute to the overall timeframe. Each additional room contains electrical outlets, windows, and other components that require individual attention. Multi-story homes add complexity with additional staircases, HVAC zones, and plumbing runs to evaluate.
Age of the House
Older homes often require more thorough examination due to outdated systems and materials. A Victorian-era home with original plumbing and electrical work demands closer scrutiny than a newly constructed property built to current codes. Inspectors spend extra time documenting aging components and identifying systems that may need updating.
Conversely, newer homes typically feature modern materials and construction methods that are easier to assess quickly. However, even new construction isn’t immune to defects. Inspectors still need to verify that all systems function properly and that construction meets local building standards.
Condition of the House
A well-maintained property allows inspectors to move efficiently through their checklist. Clean, organized spaces with accessible systems enable quick visual assessments and testing. However, when inspectors encounter potential problems, they must investigate further.
Homes showing signs of neglect or damage require additional documentation time. Inspectors might need to photograph multiple angles of a concern, test related systems, or trace problems to their source. Each discovered issue adds minutes to the overall inspection duration.
Average Inspection Times
While every property is unique, certain property types fall into predictable timeframes based on industry standards and inspector experience.
Small Apartment or Condo
Condominiums and small apartments typically require 1.5 to 2.5 hours for a complete inspection. These compact living spaces have fewer systems to evaluate and limited square footage to cover. However, inspectors still examine all accessible components thoroughly, including shared building systems that serve the unit.
The reduced timeframe reflects fewer rooms, a single HVAC system, and simplified plumbing configurations. Electrical panels in condos are often smaller and easier to assess quickly.
Single-Family Home
Most single-family homes fall into the 2 to 4-hour range, representing the industry standard. A typical 1,500 to 2,500-square-foot home with 3 bedrooms and 2 bathrooms usually takes approximately 3 hours to inspect completely.
This timeframe accounts for examining all interior spaces, testing major systems, evaluating the exterior envelope, and documenting findings. Inspectors can maintain a steady pace while being thorough in their assessment.
Large or Complex Property
Expansive homes exceeding 3,000 square feet or properties with unique features may require 4 to 6 hours or more. Luxury homes often include additional systems like swimming pools, elaborate landscaping features, outbuildings, or smart home technology that demand specialized attention.
Complex properties might feature multiple HVAC zones, extensive electrical systems, or custom construction details that require extra documentation time. Historic homes with unique architectural features also fall into this extended timeframe category.
What the Inspector Checks
Understanding what inspectors examine during their visit helps explain why the process takes several hours. Professional home inspections are comprehensive evaluations that cover all major home systems and structural components.
Structural Components
Inspectors begin by evaluating the home’s foundation, framing, and overall structural integrity. They examine basement walls for cracks, check floor joists for sagging or damage, and assess the condition of load-bearing elements. This structural assessment forms the foundation of the entire inspection process.
Windows and doors receive attention for proper operation, weatherproofing, and security features. Inspectors test locks, check for air leaks, and ensure windows open and close smoothly.
Electrical System
The electrical system evaluation includes examining the main panel, testing outlets throughout the home, and verifying proper grounding and circuit protection. Inspectors check for code violations, outdated wiring methods, and potential safety hazards.
They test GFCI outlets in bathrooms and kitchens, verify proper outlet spacing, and examine light fixtures and switches. Any signs of amateur electrical work or code violations receive special documentation.
Plumbing System
Plumbing inspections cover water supply lines, drainage systems, and fixtures throughout the home. Inspectors test water pressure, check for leaks, and evaluate the condition of visible pipes. They examine water heaters for proper installation, venting, and safety features.
Bathroom and kitchen fixtures undergo functional testing to ensure proper drainage and water flow. Inspectors also check for proper caulking and signs of water damage around plumbing fixtures.
HVAC System
Heating, ventilation, and air conditioning systems require detailed evaluation of equipment condition, proper installation, and operational efficiency. Inspectors examine ductwork for damage or disconnections, test thermostats, and evaluate air filtration systems.
They check furnace heat exchangers for cracks, assess air conditioning refrigerant lines, and verify proper venting for combustion appliances. Indoor air quality factors like ventilation adequacy also receive attention.
Roof and Attic
Roof inspections examine shingles, flashing, gutters, and overall weatherproofing from both interior and exterior perspectives. Inspectors look for missing or damaged shingles, proper flashing around penetrations, and adequate attic ventilation.
Inside the attic, they examine insulation levels, check for air leaks, and inspect the roof structure from below. Signs of water infiltration or pest intrusion receive thorough documentation.
Frequently Asked Questions
Can I shorten the inspection time by being present?
While your presence is encouraged for educational purposes, it won’t significantly reduce inspection time. Inspectors work methodically through their checklist regardless of whether homeowners are present. However, being there allows you to ask questions and understand your future home better.
What happens if the inspector finds major issues?
Discovering significant problems doesn’t necessarily extend the inspection time dramatically. Professional inspectors document issues efficiently and continue their systematic evaluation. However, extensive problems might add 30-60 minutes to the overall process.
Should I hire additional specialists for specific systems?
General home inspections cover all major systems but may not include specialised evaluations like termite inspections, radon testing, or swimming pool assessments. These additional services require separate appointments and specialised expertise.
How soon will I receive the inspection report?
Most inspectors provide reports within 24 hours of completing the on-site evaluation. Some offer preliminary findings immediately after the inspection, with detailed written reports following shortly.
Planning Your Inspection Day
Home inspections represent a crucial investment in your property purchase decision. While the 2-4 hour timeframe might seem lengthy, this thorough evaluation can save you thousands in unexpected repairs and provide peace of mind about your investment.
Schedule your inspection when you can be present for at least part of the process. Bring a notebook to jot down important findings and don’t hesitate to ask questions about anything you don’t understand. Remember that a longer inspection often indicates thoroughness rather than problems.
Consider the inspection an educational opportunity to learn about your future home’s systems and maintenance needs. The time invested in this process pays dividends in informed decision-making and future home ownership success.


How to Watch Descargar Rebelde 2022 temporada 2 720p mkv Season 2: Your Complete Guide
Introduction The Mexican teen drama “Rebelde” made a spectacular comeback in 2022, capturing hearts worldwide with its modern take on...


DoepBox: The Complete Guide to This Revolutionary Platform
Introduction DoepBox has emerged as a game-changing solution for users seeking streamlined workflow management and enhanced productivity. Whether you’re a...


The Swan Princess: A Royal Family Tale Yts – Timeless Magic for All Ages
Introduction Disney may dominate the animated fairy tale landscape, but “The Swan Princess: A Royal Family Tale Yts” proves that...


Understanding ev01net: Your Complete Guide to Getting Started
Introduction The digital landscape continues to evolve at breakneck speed, with new platforms and technologies emerging regularly. Among these innovations,...


“Yo no soy mendoza lucho velazco”: Netflix’s New Comedy Series Takes Streaming by Storm
Introduction Netflix has struck comedy gold with “I Am Not Mendoza” (yo no soy mendoza lucho velazco), a fresh series...


Does Lysol Kill Roaches? The Truth About This Common Household Hack
Introduction When you spot a cockroach scurrying across your kitchen floor, panic sets in fast. You grab the nearest weapon...


The Inspiring Journey of Ximena Brittan Gunusen: A Story of Resilience
Introduction Ximena Brittan Gunusen represents more than a name she embodies resilience, strength, and an unwavering commitment to making the...
-
 Travel3 years ago
NEW ZEALAND VISA FOR ISRAELI AND NORWEGIAN CITIZENS
-
 Technology3 years ago
Is Camegle Legit Or A Scam?
-
 Uncategorized3 years ago
AMERICAN VISA FOR NORWEGIAN AND JAPANESE CITIZENS
-
 Health3 years ago
Health Benefits Of Watermelon
-

 Home Improvement6 months ago
Artificial Grass Designs: Perfect Solutions for Urban Backyards
-
 Fashion2 years ago
Best Essentials Hoodies For Cold Weather
-
 Uncategorized3 years ago
How can I write a well-structured blog post?
-
 Technology1 year ago
Imagine a World Transformed by Technology and Innovation of 2023-1954