
News
How to Make aespa Album

Aespa Album is a photo album that captures the memories of your loved ones in a unique and beautiful way. It’s an interesting concept, and it’s one that has started to take hold in recent years. For those of us who have photos of our loved ones, but don’t want to deal with putting them all into a traditional photo album, aespa album is a great solution. Plus, they are incredibly affordable, meaning you can get one for every member of your family. If you’re considering getting an aespa album for yourself or for someone you love, read on for some tips on how to make one.
What You’ll Need
To make aespa album, you’ll need:
1. Start by selecting your photos. You can use any photos that you want for your album, but you’ll need at least 20 pictures to make the cover. If you have more than 20 pictures, you can choose to put some of them on the inside cover and others on the outside cover.
2. Once you’ve selected your photos, lay them out in a chronological order on your album page. Be sure to number each photo so that you can easily locate it later on.
3. Use the pen or pencil to write down the date of each photo and what happened in that particular moment. For example, if a photo shows you and your best friend catching a fish together, write “4/24/2013 fishing” next to the photo and describe what happened in the caption (like how long it took to catch the fish).
4. Once all of your captions are written, select one of your photos and start cutting out around it with scissors. Make sure not to cut into the photo itself! You’ll need to leave about 1 cm (0.4 inch) around it so that you can attach the sticker or label later on.
5. Once all of your cuts are made, peel off the backing sheet from your sticker or label and apply it to the outer edge of your cut photo. Make sure that the sticker or label is lined up perfectly with the edges of the photo. Then, peel off the protective sheet and press firmly onto the sticker or label to make it stick.
6. Repeat this process with each of your photos, rotating them as you go so that all of them have a sticker or label on at least one edge.
7. Once all of your photos are decorated, it’s time to put the album together! Start by flipping over your white album page and sticking the inside cover onto the front cover. Then, stick each of your cut photos onto the inside cover in chronological order. Be sure to number them as you go so that you can easily find them again later on.
8. Finally, attach the outside cover to the front cover and enjoy your aespa album.
What you need
To make an aespa album, you will need:
1. Choose the paper you would like to use for your album. Some popular types of paper are parchment, cardstock, and even old newspapers. Once you have chosen the type of paper, take note of its thickness. Thinner paper will not hold up to a lot of wear and tear, while thicker paper can be more durable.
2. Next, cut out your desired shape for your album cover using your cutting mat and/or a ruler and scissors. Try to keep your cover as symmetrical as possible so that the finished product looks polished and professional.
3. Next, sew the cover onto one end of your chosen paper using thread and pins. Be sure to leave a few inches at the top and bottom of the cover so that you can fold it over once it’s sewn on (see diagram below). Do not line up the edge of the cover with the edge of the paper – this will cause problems when you try to turn it over after sewing it on! Once you’ve sewn on both ends of your cover, trim off any excess material with a seam ripper or scissors (see diagram below). 4. To finish off your album cover, trace around each side of the cover using a pencil and then cut out the traced shapes with a pair of scissors.
5. To insert your photo or artwork, simply fold over one of the top corners of your cover and press it down gently until it’s snug against the artwork. Then use a seam ripper or scissors to trim off any excess fabric around the edge of the cover.
How to make the aespa album
Creating an aespa album is simple, fun and perfect for any occasion.
To make your aespa album, you will need:
1. Decide what kind of album you would like to make. There are many different styles to choose from, so feel free to pick the one that best suits your personal style.
2. Cut out the pages that you want in your album. You can choose to have multiple pages per sheet of paper, or just one large page per sheet.
3. Take your photos and place them on the pages that you’ve cut out. Make sure to add some adhesive stickers around each photo so that it sticks down securely.
4. Once all of your photos are in place, it’s time to create the cover for your aespa album! This can be done in many ways – some people use fabric scraps while others use cardboard or poster board. Whatever you decide, make sure it’s big enough to fit all of your photos and stickers inside.
How to print the aespa album
To print the aespa album, follow these steps:
1. Upload your photos to Picasa or any other photo hosting service.
2. On the home screen of your computer, open up a new document and type in “aespa album” as the title.
3. Insert all of your photos into this document and arrange them however you like. You can resize and crop them if necessary.
4. Click on “Print Preview” and make sure that the quality is set to “High.”
5. Click on “Print” button and wait for the printer to finish printing your album.
Conclusion
Aespa is a wonderful way to immortalize your loved ones and create a tangible memorial of their lives. Whether you’re creating an album for yourself or as a gift for someone else, following these simple steps will help you produce the perfect specimen. So don’t wait any longer, get started on your aespa album today.

History is a tapestry woven from countless threads of events, discoveries, and milestones. Understanding the trajectory of these moments can illuminate how our present has been shaped. In this timeline, we take a journey backward from 2023-1954, tracing significant global events that have left an indelible mark on humanity.
2023: Looking Forward
As we stand in 2023, humanity is on the precipice of remarkable advancements and challenges. The world is grappling with the implications of AI, renewable energy, and space exploration while also facing pressing issues such as climate change and global health crises.
Key Events
- AI and Technology: AI continues to revolutionize industries, from healthcare to finance, driving unprecedented efficiencies and innovations.
- Sustainability Efforts: Countries worldwide are making significant strides toward renewable energy, with solar and wind sources gaining momentum as primary power sources.
- Space Exploration: Mission initiatives from NASA and private companies like SpaceX aim to establish a human presence on Mars within the next decade.
2020-2019: A New Decade Dawns
Key Events
- COVID-19 Pandemic: The world faced an unprecedented health crisis with the outbreak of COVID-19, leading to global lockdowns and a race for vaccines.
- Technological Integration: Remote working and digital transformation accelerated as businesses adapted to the new normal.
- Environmental Policies: Global agreements, such as the Paris Agreement, saw renewed commitments to combat climate change.
2010-2000: The Digital Revolution
Key Events
- Social Media Boom: Platforms like Facebook, Twitter, and Instagram transformed communication and marketing.
- Smartphone Proliferation: The rise of smartphones changed how we interact with technology, work, and consume media.
- Globalization: Increased connectivity and trade fostered a more interconnected world economy.
1990-1980: The End of the Cold War
Key Events
- Fall of the Berlin Wall: In 1989, the Berlin Wall fell, symbolizing the end of the Cold War and the beginning of German reunification.
- Advances in Computing: Personal computing began to take off, with companies like Microsoft and Apple introducing pivotal products.
- Cultural Shifts: The 80s saw significant changes in pop culture, from the rise of MTV to iconic movies and music that still influence today.
1970-1960: Civil Rights and Moon Landings
Key Events
- Civil Rights Movement: The fight for civil rights in the United States brought about significant legislative changes, including the Civil Rights Act of 1964.
- Apollo Moon Landing: In 1969, NASA’s Apollo 11 mission successfully landed humans on the Moon, a landmark achievement in space exploration.
- Environmental Awareness: The first Earth Day was celebrated in 1970, marking the rise of the ecological movement.
1959-1954: Foundations of Modernity
Key Events
- Space Race Begins: The Soviet Union’s launch of Sputnik in 1957 marked the start of the space race.
- Civil Rights Milestones: The 1954 Brown v. Board of Education ruling was a significant step toward desegregation in the United States.
- Cultural Icons: The 50s saw the rise of cultural icons like Elvis Presley, who transformed the music scene, and Marilyn Monroe, who became a symbol of Hollywood glamour.
Conclusion
From 2023-1954, the world has witnessed profound changes and advancements that have shaped our current era. Each decade brought unique challenges and achievements, contributing to the complex, interconnected world we live in today. As we look forward, understanding this historical context helps us navigate the future with greater insight and appreciation for the progress made.
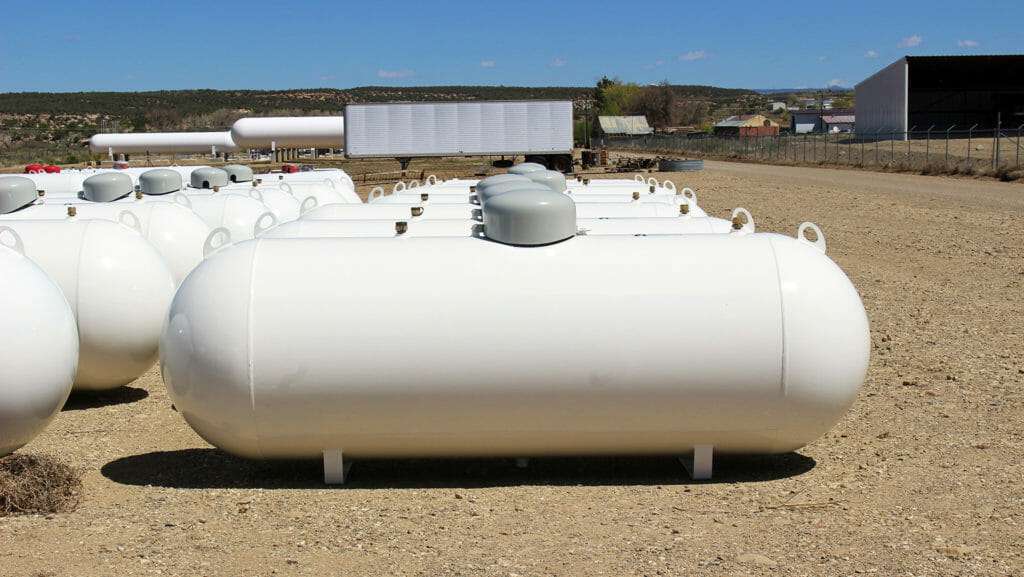
When searching for a “Propane Tank for Sale,” it’s crucial to make informed decisions to ensure safety, efficiency, and cost-effectiveness. Whether you need a propane tank for grilling, heating your home, or fueling appliances, knowing how to identify a quality tank can save you both time and money. Here’s what you should consider:
Determine the Right Size and Capacity
Propane tanks come in various sizes, and selecting the right one is essential:
- Small Tanks (20-100 lbs): Ideal for barbecue grills and portable heating.
- Medium Tanks (100-500 gallons): Used for residential heating, hot water, or cooking appliances.
- Large Tanks (500-1,000 gallons or more): Suitable for heating large homes or commercial use.
Check for Certification and Compliance
Ensure the propane tank has up-to-date certification and complies with local and national safety standards. Certified tanks are tested for safety and durability, reducing the risk of leaks and other hazards.
Inspect the Condition of the Tank
When looking at a propane tank for sale:
- For New Tanks: Check for warranty coverage and any included services like installation or first-fill discounts.
- For Used Tanks: Look for signs of wear such as rust, dents, or heavy discoloration. Check the manufacture date, generally stamped on the collar, as tanks typically have a service life of about 12 years.
Consider the Seller
Buying from a reputable dealer can make a difference. Authorized dealers are more likely to offer properly inspected and certified tanks. They can also provide valuable services such as delivery, installation, and regular maintenance.
Assess Additional Features and Accessories
Some tanks come with gauges that indicate the amount of propane left. Consider tanks that offer these features to avoid running out of gas unexpectedly. Additionally, check if the tank has any safety features such as overfill protection devices.
Compare Prices
Shop around and compare prices from different sellers. Be wary of deals that seem too good to be true, as they might involve uncertified or poorly maintained tanks. Remember, investing a bit more upfront can potentially save you from costly issues down the road.
Read Customer Reviews
If purchasing online or from a large distributor, look at customer reviews to gauge the quality of the tank and customer service. Reviews can provide insight into the longevity and reliability of the propane tanks.
Conclusion
Finding a good propane tank for sale involves careful consideration of size, safety standards, condition, and seller reputation. By taking the time to assess these factors, you can ensure that you purchase a safe, efficient, and cost-effective solution for your propane needs. Remember, the right propane tank will not only meet your immediate needs but will also serve you safely for years to come.

Are you looking for a fun and tasty way to explore the depths of the internet? Look no further than Nealfun, an internet site that offers a completely unique collection of web experiments designed to entertain, train, and push the bounds of what records can do. With 17 hyperlinks, each with titles that range from Baby Map to The Size of Space, Nealfun is a treasure trove of interactive stories that will keep you entertained for hours on end.
Meet the Mastermind Behind Nealfun
Neal Agarwal, the brainchild at the back of Nealfun, is a laptop technology graduate from Virginia Tech with a passion for “creative coding.”. Since the young age of 10, Neal has been interested in the limitless possibilities that coding can bring to existence. His knack for growing engaging and interactive web stories has caused the birth of Nealfun, a platform that showcases his creativity and technical knowledge.
The Password Game: A Whirlwind of Randomness
One of the standout capabilities of Nealfun is ‘The Password Game’, a mind-boggling internet test to take a look at your memory and good judgment competencies. With 35 regulations that become increasingly bizarre and quirky as the game progresses, The Password Game is a true test of wit and agility. Can you crack the code and unencumber the secrets and techniques hidden within?
What Makes Nealfun Stand Out?
Nealfun is more than just a collection of random internet experiments; it’s a testament to the energy of creativity and innovation. Each hyperlink on the website offers a unique enjoyment that challenges traditional wondering and encourages customers to think outside the box. Whether you’re exploring the intricacies of the human frame or delving into the vastness of space, Nealfun has something for anybody.
Take Your Internet Experience to the Next Level
If you are uninterested in the same antique websites and are searching for something sparkling and interesting, look no further than Nealfun. With its variety of internet experiments and interactive features, Nealfun is assured to offer hours of entertainment and training. So why wait? Dive into the arena of Nealfun nowadays and see where your interest takes you!
In Conclusion
Nealfun is a one-of-a-kind website that offers a blend of amusement, training, and creativity. With Neal Agarwal at the helm, this platform keeps pushing the bounds of what statistics can do and how we engage with the internet. So why not embark on a journey of discovery and exploration with Nealfun?
How WellHealthOrganic Home Remedies Tag Connect Mind, Body, and Environment
Analyzing the Action: Top Matches and Moments from WWE SmackDown Episode 1491
From Mohali to the UAE: How Ramneek Sidhu Built Digital Kings into a Premier Digital Marketing Agency
How WellHealthOrganic Home Remedies Tag Connect Mind, Body, and Environment
In this blog post, we’ll explore how simple yet profound practices can transform your well-being while fostering a deeper connection...
Analyzing the Action: Top Matches and Moments from WWE SmackDown Episode 1491
If you thought the squared circle was just a stage for scripted drama, think again! Episode 1491 of WWE SmackDown...
From Mohali to the UAE: How Ramneek Sidhu Built Digital Kings into a Premier Digital Marketing Agency
In today’s digital age, where online presence can make or break a brand, one name is making waves across continents:...
A Comparison of Invisalign and Its Leading Competitors
Are you dreaming of a confident smile but hesitant to embrace traditional metal braces? You’re not alone! The quest for...
Invisalign competitors and modern orthodontic treatments
Are you on a quest for the perfect smile but feeling overwhelmed by your options? With so many orthodontic treatments...


Unpacking the Nnevelpappermann Leaks: What You Need to Know About This Explosive Incident
In a world where secrets can shift the balance of power and information is currency, few events have sent shockwaves...


The Emergence of Luther Social Media Maven Keezy.co
Introduction to Luther Social Media Maven Keezy.co Are you ready to revolutionize your social media game? Look no further than...
-
 Travel2 years ago
NEW ZEALAND VISA FOR ISRAELI AND NORWEGIAN CITIZENS
-
 Uncategorized2 years ago
AMERICAN VISA FOR NORWEGIAN AND JAPANESE CITIZENS
-
 Health2 years ago
Health Benefits Of Watermelon
-
 Lifestyle1 year ago
These Easy, Affordable Improvements Can Completely Transform Your Home
-
Technology1 month ago
Imagine a World Transformed by Technology and Innovation of 2023-1954
-
 Lifestyle2 months ago
The Role of Door-to-Door Apps in Voter Engagement
-
Home Improvement9 months ago
11 Amazing Insights into Home Decor Gifts – Elevate Your Gifting Game
-
 Business2 months ago
Metaphysical Stores Near Me